
Table of Contents
Creating a new Al for PODO
Here's a refresher to eliminate confusion before beginning. PODO is the software used for programming the Hubo robots to move. “Podo” actually means “grape bunch” in Korean, and “Podo Al” refers to one grape. This is why our individual program to operate the Hubo robot is called an Al.
Author: Santiago Ricoy Email: ricoys1@unlv.nevada.edu
Date: Last modified on 08/02/2016
Keywords: PODO, AL, new al, Hubo, main.cpp, SQLite

This is a picture of the completed GUI that will run a simple test program to make DRC-Hubo move a hand.
Purpose and Intended Readers
This tutorial's purpose is to give a general outline of how to create a new Al in PODO. There are several ways to go about this, but this is focused on one end goal.
This tutorial assumes the reader has the following background and interests:
Know how to:
- Open and use Qt Creator and SQLite in Ubuntu.
- Can read and modify C++ code to correct errors.
Items that may help:
-Understanding joint directions and how to manipulate joints using the Hubo-i
This may also interest you if you want to create a simple motion with the DRC-Hubo (or Hubo2+) platform, as creating a separate dialog for your motion involves some of these steps.
Important info:
PODO is made up of essentially the Daemon, shared memory, and ALs so nothing is accessed directly via the GUI, but rather sent to the Daemon through shared memory, which is then communicated to the robot from there.
So here we will make the Al and its user interface separately, then connect them to have a functioning button at the end.
Materials List
You will need:
- Intel Nuc (or other computer if DRC-Hubo physical motion is not necessary) with Ubuntu 14.04 or later installed.
- The PODO software.
- Qt Creator installed.
Getting Set Up
First, you'll want to open Qt Creator and open a new session. Please ensure that in the “Projects” tab, all of your projects are building to the correct directories. This could cause unexplained issues later on if left unchecked.

Go into your source folder for PODO and add three projects to the session: ALPrograms, PODOGUI, and PODOLauncher.
I only add PODOLauncher for convenience of launching after rebuilding the projects. Another tip is to open up two textboxes in Qt to help you navigate/copy and paste between them. This can be done with a button found in the upper right hand corner of the window.
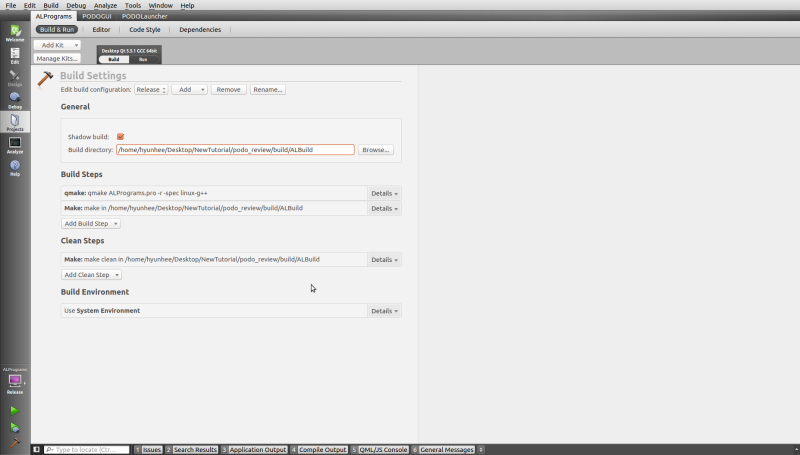
Now make sure to set all project configurations to release (as opposed to debug), and be sure to set the build directory to the correct build folder within your PODO folder. Be sure to double check that this is indeed the same directory as the rest of your files. If the program is run and these are wrong, your program could be built in the wrong directory and therefore not show up, or potentially a button click can run completely different commands from a different project (use unique names).
Creating the AL
After that's done we're going to work on actually making a new Al without the GUI side. This is quite simple and there is a wizard to walk you through adding a subproject to ALPrograms.


Right click “ALPrograms” in your file tree on the left and select “add new subproject”. You'll get this window, where you should choose a new application, and within that a new “Qt Console Application”. I've called this example “ALexample”. Name yours whatever you need so long as you can remember it because it will show up a lot, and click on through the next dialogs. I will refer to the files within this tutorial with the base name “ALexample”.

Click into your “ALexample.pro” file in Qt and then click into “ALTutorial.pro”. You'll notice these two are very different. The “AlTutorial” file has all of the necessary statements to make use of the xenomai libraries and includes the headers in your folder. If you have not installed Xenomai3 then this would be a good time to go back through that tutorial.

Copy and paste all of this into your new .pro file, replacing everything that was in it. If for whatever reason that's missing, you could also just type it in the same as above.
Right click your “ALexample” folder and rebuild. You should hit two errors saying that some .h files are missing.
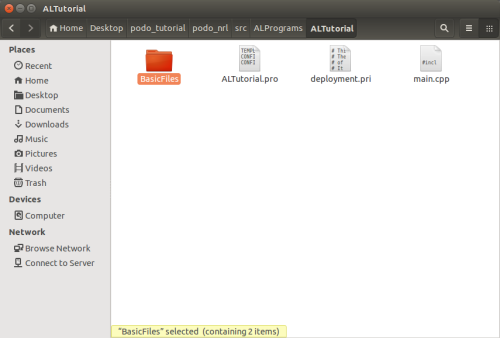
Using your file explorer, go into the “src” folder containing your new project, into the “ALPrograms” folder, where you will find your own “ALexample” folder. In the same directory will the be the “ALTutorial” project folder; go into it. Copy the “BasicFiles” folder, and then paste it into the “ALexample” folder.

In Qt, right click your ALexample folder, and click “Add existing files…”. Add the folder/files that were just pasted into the ALexample folder. Try rebuilding again just to be sure it happens normally.
Then copy the contents of the main.cpp file from “ALTutorial” into your Al's main.cpp file. For this one, here's an excerpt from the introductory comment block in the template to read and keep in mind.
Please do not change the "RBInitialize" function and fore code of main().
You may express your idea in while loop of main & real-time thread.

Each AL-Process has its own command structure in Shared Memory.
So, it can have its own command set.
Make sure that the command set of each AL-process start from over than 100.
Under the 100 is reserved for common command set.

Now, you can do everything what you want..!!
If you have any question about PODO, feel free to contact us.
Thank you.


Jungho Lee		: jungho77@rainbow.re.kr
Jeongsoo Lim	: yjs0497@kaist.ac.kr
Okkee Sim		: sim2040@kaist.ac.kr

Copy Right 2014 @ Rainbow Co., HuboLab of KAIST
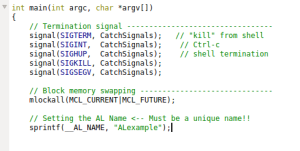
Now, you have an ALTutorial clone, essentially. However, we'll need to make a few changes immediately. The first of these is to change our Al name in this sprintf statement. You'll need to know exactly what you called this later, but don't worry, you can always check.
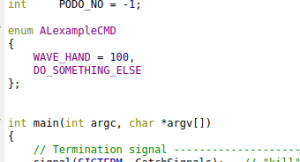
Next we'll add a named command set. The easiest way is to use an enumeration declaration as you see here. If you read the above comment block you'll recall that our command numbers need to be equal to or more than 100, so we'll start it there, and as we add commands to the Al, we can simply add them to the enumeration.
Creating the GUI

Right click the “PODOGUI” folder in Qt, and select “Add New…”. You'll be creating a designer form class. With or without buttons is really up to you at this point, but I chose without them. I'm also following the general naming convention of “*Name of Al purpose*dialog” so mine is “exampledialog”, and I'll be referring to it as if you did the same.
This will give you a form, found in the “Forms” folder, source file in the “Sources” folder, and a header in the “Headers” folder.

Go into exampledialog.h and include CommonHeader.h, and in the private section of this class, declare an integer whatever you prefer; I went with “ALNum_example”. This will later denote where we send commands.
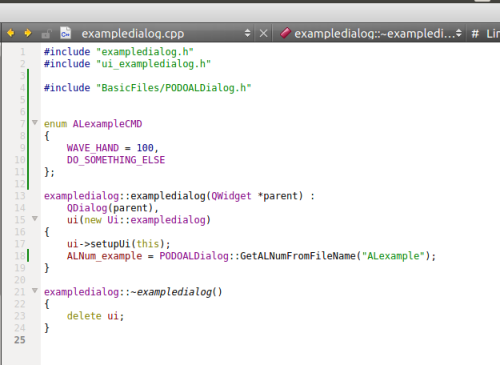
Go into your “exampledialog.cpp” file, and include PODOALDialog.h (if it doesn't work, try using the folder by using “BasicFiles/PODOALDialog”). Also add the same enumeration declaration from the main.cpp file in the ALexample folder. Remember that name from the ALexample folder main.cpp? Go ahead and initialize the variable I named “ALNum_example” with the method shown, using your name in a string as the parameter. I used “ALexample”. Do this under the line that reads “ui→setupUi(this);” like I did in the picture above.

Now in the Forms folder, double-click exampledialog.ui, and drag out a push button for us to execute our command with later. I also dragged out a label to accompany my button. Double click the button to edit its text (fastest way to do so).

On the right is a text box labeled “objectName” that lets you edit the name of the button object. I recommend the most common convention for push buttons: pb_*action* so mine is “pb_example”. Then right-click the button and select “Go to slot…”. Select “clicked()”. This will open up a method definition in “exampledialog.cpp”, called “on_pb_example_clicked” and within that method's code block, I have pasted the basic command sending sequence. Do the same. We'll set the user command as one of those from our enumeration and the command target as the integer I named “ALNum_example”. That code is shown below.
  USER_COMMAND cmd;
  cmd.COMMAND_DATA.USER_COMMAND = *command from enumeration declaration*;
  cmd.COMMAND_TARGET = ALNum_example;
  pLAN->SendCommand(cmd);

We should be about done with the GUI, so rebuild to make sure we haven't messed anything up. Warnings are normal, so long as we have no red errors. It may take around a minute. Then right click PODOGUI and run it. You'll find that you can't find your example dialog anywhere. So we're going to fix that. Go into “GUIMainWindow.h” and at the top you'll want to include “exampledialog.h” just like the other dialog headers, as you can see I've done here.

Scroll down in the same file until you find the “User Dialog” comment. Underneath that are pointer declarations for the different dialog classes. Go ahead and add yours as well, following the same format for convenience, the same way you can see mine here.
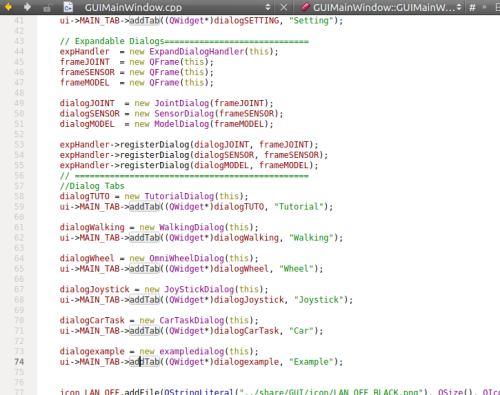
Now go into “GUIMainWindow.cpp” and scroll down until you find the section displayed here, where you can see an “Expandable Dialogs” comment. I added my own comment (dialog tabs) which probably won't be found in your files, but should be added for convenience. Add your matching dialog instance and tab method as I have here using this format:
dialogexample = new exampledialog(this); ui→MAIN_TAB→addTab((QWidget*)dialogexample, “Example”);
That last bit there is the actual text that will show up on your tab.
Finally, let's rebuild the PODOGUI folder, and run it. You should find that the tab shows up, button and all.
Connecting the Button to the Al
It's nice to have a button, but wouldn't it be great if it could do something?
So this is the hard part as everything seems to go wrong here, but if you've gotten through all the above steps, you should find that it works out well. Double check that all of the build directories are correct so that the programs are looking for the correct files when compiling.
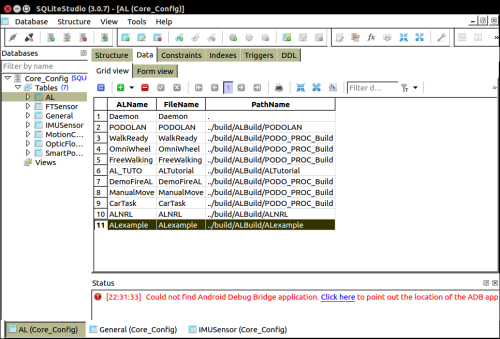
Open SQLite, and open the database that can be found in the “exe” folder of your PODO project. It is called “Core_Config.db”. Once that's open, double click “AL”, and open the “data” tab. It will look like above (depending on your system theme). As you can see, I've added an extra row at the bottom. The names I used are the same as what I used in the ALexample folder's main.cpp file as the Al name. The directory is the specific folder that the “Alexample” project will build in, within the build folder of the PODO directory. Now commit your changes.
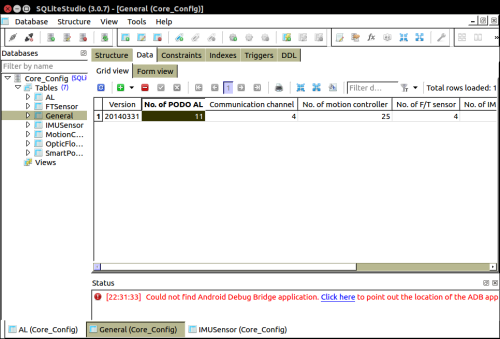
Double click “General” in the database, and open the “data” tab. Increment the number of Als by one (1) to make way for your new Al (in my case that makes it 11). Now commit your changes and close SQLite.
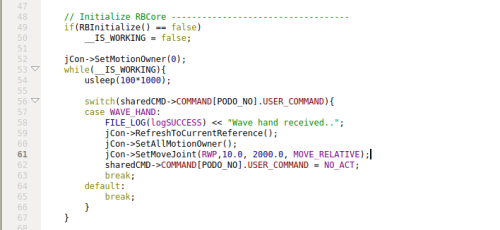
Lastly, hop back into your ALexample folder's main.cpp file and in the switch statement, use the code seen above. The first step is to use a number from your enumeration declaration for your case; here I used “WAVE_HAND”. The next line writes your message when the command goes through. The next two authorize you to move joints, and the “SetMoveJoint” method is what actually moves things; the order of parameters is: joint name, angle, time for movement, and relative/absolute movement. The last “sharedCMD” method says no more movements will be made.
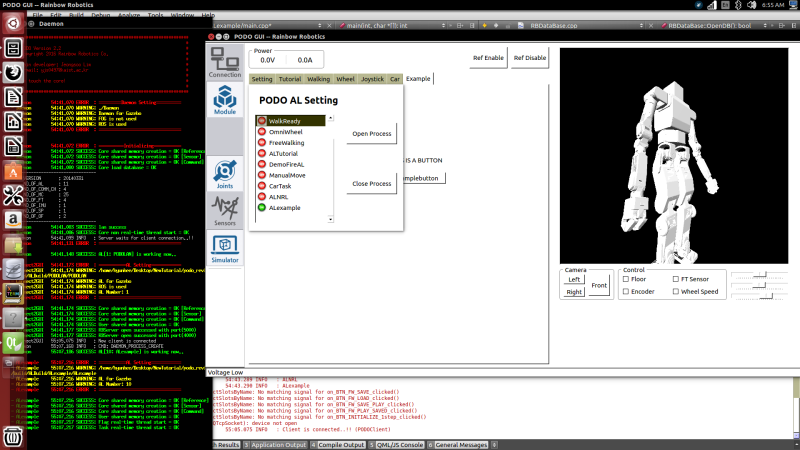
That's all you should have to do! When you run the daemon, and connect the GUI to it, you will find that you can now open the “ALexample” process and run your command. Hubo's hand should move 10 degrees.