Table of Contents
Avatar-Kairos Tutorial
Author: <Armaun Zargari> Email: zargari@unlv.nevada.edu <Sunghoon Ha> Email: sunghunha99@naver.com
Date: Last modified <01/27/22>
Keywords: <Kairos Autonomi, Kairos, Unmanned ground vehicle, Avatar Kairos>
Driving the Golf Cart Outside
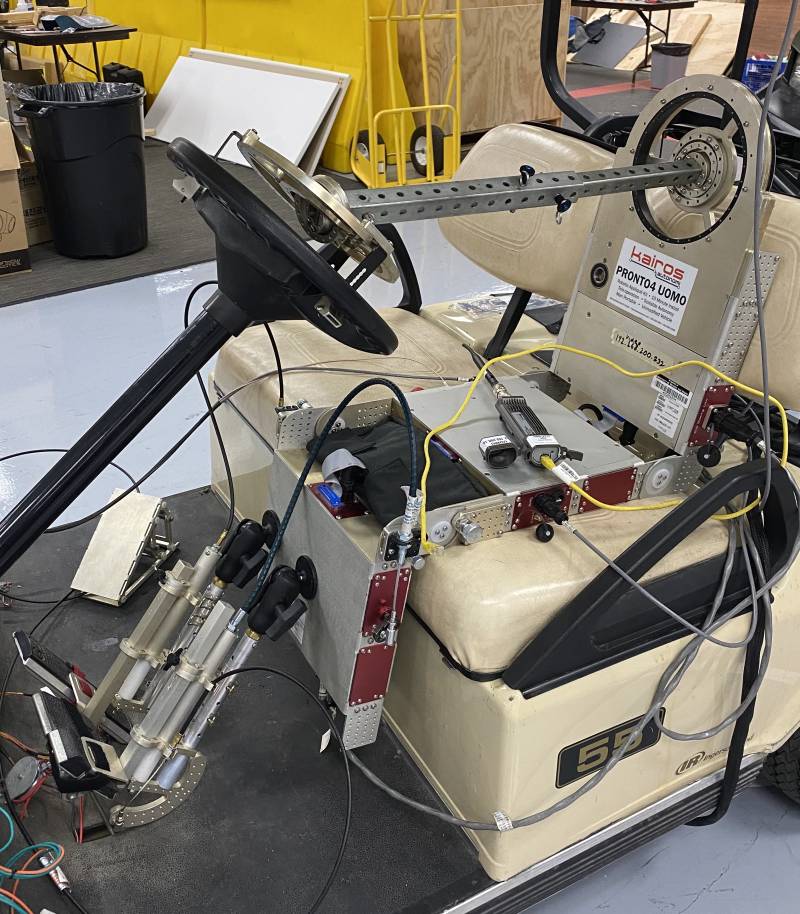
Shown above is a picture of Kairos Autonomi’s Pronto 4 UOMO kit that allows for the converting of a normally man-driven vehicle to that of a remotely controlled vehicle. When used, Pronto 4 UOMO is placed in the drivers seat of the vehicle and takes roughly 10 to 15 minutes to install. One of the primary benefits of this kit is the fact that it allows for a high level of modularity and may be easily transferred to different vehicles. Time for completion: Approximately 30 minutes
Motivation and Audience
The purpose of this tutorial is to demonstrate the basic setup of Pronto 4 UOMO from both hardware and software contexts as well as discuss how one may remotely drive a golf cart equipped with the Kairos hardware.
Additional documentation may be found via Kairos Autonomi's website and YouTube videos linked below:
* Kairos Bulletin Program http://www.kairosautonomi.com/bulletins (primary source of documentation)
* Assembling Kairos in 10 minutes [https://www.youtube.com/watch?app=desktop&v=a3IgtH2YsEc|video]]
* Shepherd P4S4 UOMO Operations [http://www.kairosautonomi.com/uploads/files/192/Shepherd-P4S4-Uomo-Operations-020400.pdf]] (one of more useful pieces of documentation)
The remainder of the tutorial is presented as follows:
Required Hardware
How the Hardware is Connected
Required Software
Things to Know Before Driving with Kairos
Driving a Golf Cart with Kairos
Required Hardware
To complete this tutorial, you will need the items listed below:
- Pronto 4 UOMO Body
- Throttle Leg
- Brake Leg
- Kairos Steering Wheel and connecting “Nose”
- Power Line/Jumper Cables
- GPS Module
- Video Module
- Operator Control Unit & UOMO Radios
- Laptop with Kairos Autonomi Shepherd Software
- Logitech Steering Wheel, brake/throttle/clutch pedals, and stick shift
- 3 Ethernet Cables (CAT5+)
- Golf Car Battery Charger
- Power Supply
How the Hardware is Connected
Required Software
The primary software used here is Kairos Autonomi's proprietary Shepherd Pronto 4 Series 4 UOMO software. Upon starting the computer, the software automatically boots up and there are 4 tabs that launch
- djBasis - Active Mimic
- E-Stop Beacon
- Kairos Autonomi Shepherd (main tab used for operation)
- DJ Shared Data Link
When the software is launched the first screen one will see is the djBasis - Active Mimic tab.
This tab displays all executables that are running and which functionality of the software is being used. Ensure under the “Module Name” section that djBasis.exe, djShepherd.exe, djSharedLinkF.exe, and beacon.exe are active. Notice the names of the executables are the same as the other software tabs being used (also pictured above). For the purposes of this tutorial, also ensure that Shepherd_BEACON_OCU is selected under “Functionality.”
The E-Stop Beacon tab must also be set on the “Run” command or else the software and robot will not function. The purpose of the E-Stop Beacon is for increased safety. If any other command is selected, the engine of the cart will stop and will not move. As previously mentioned, Kairos Autonomi Shepherd is the primary executable of concern and the most time will be spent here during operation. This allows for the activation and controlling of the robot, the viewing of the video feedback, and the monitoring of both joystick/gamepad input, and the output provided with the golf cart.
Driving a Golf Cart with Kairos
Setup
PRIOR TO OPERATION, ENSURE THE CART BATTERY IS FULLY CHARGED. Both UOMO and the golf cart use the battery stowed underneath the cart seat as their form of power. In order to avoid potential losses in connection and ensure the safety of the operator, spectators, and surrounding environment the battery must be 100% charged. Before the golf cart is powered on, ensure that UOMO correctly responds to user inputs from the gaming pedals and steering wheel. Only then, may the golf cart be turned on.
The order of completion for setting up the hardware is arbitrary and is personal preference. However, all steps below must be completed:
- Connect the cart battery with the power line
- Move UOMO robot to the seat
- Connect the power line to UOMO's corresponding ports
- Attach and Calibrate the throttle & brake legs
- Connect the GPS module to UOMO's corresponding ports
- Connect the video module to UOMO's corresponding ports
- Connect the nose of the steering wheel
- Connect both radios (one for UOMO and one for OCU)
The videos below demonstrate an example of the procedure (both hardware and software):
Hardware
* Hardware Setup Demonstration https://youtu.be/POD_wMClyEg
Software
* Software Setup Demonstration https://youtu.be/h86aXR0SW6s
Driving
* Time lapse video of Kairos driving a golf cart https://youtu.be/xnxjBm1yTPM


