Table of Contents
Optitrack Motion Capture System Build Skeleton
Author: <Hyunhee Lee> Email: lee67@unlv.nevada.edu
Date: Last modified on <06/18/17>
Keywords: <Build Skeleton>

This picture show the “Arena” software program interface for “Skeleton”.
Motivation and Audience
This is a tutorial about “Build Skeleton” from Optitrack Motion Capture system. If you are not familiar to use “Arena” which is Optitrack Motion Capture system software, Please take look at up the “Optitrack Motion Capture System Setup Guide” http://daslhub.org/unlv/wiki/doku.php?id=optitrack_motion_capture_system_setup_guide and “Optitrack Motion Capture System Motion Tracking” http://www.daslhub.org/unlv/wiki/doku.php?id=optitrack_motion_capture_system_motion_tracking.
* Know how to build skeleton.
The rest of this tutorial is presented as follows:
In order to build skeleton, you need to wear motion capture suite and attach dots on the suite. There are 2 ways to build skeleton in the “Arena”.
 1. Using 34 dots
 2. Using 36 dots
 3. Using 38 dots
Attach the Dots on the suite
In this tutorial, 34 dots used.
Step 1.
Attach the dots on the Leg and Foot.

- 2 dots on the foot.
- 2 dots on the lower leg.
- 2 dots on the upper leg.
Step 2.
Attach the dots on the back and pelvis.

- 4 dots on the back.
- 3 dots on the pelvis.(they should be aligned the high)
Step 3.
Attach the dots on the each arm.


- 3 dots on the each upper arm.
- 3 dots on the each hand.
Step 4.
Attach the dots on the hat.

- 3 dots on the hat.
Dots are attached on the Whole Body Suite
Skeleton Wizard
Step 1.
Start Skeleton Wizard.
 Click the “Wizard” tap on the top of “Arena” software interface and then click the “Skeleton Wizard”.
Step 2.
Select Marker Layout.
 Select the “Default Skeleton with 34 markers”.(because we attached 34 dots on the suite)
Step 3.
T-pose.
 Click “Next” button until “T-pose Data Source” page comes up.(we don't need instruction for markers)
And, select one of the option where you want to get the T-pose makers from.
Step 4.
Actor's Height.
 Adjust the Skeleton's dimension.
You can change the height and shoulder width of skeleton to fit your actor.
Step 5.
Skeleton Fitting.
 The skeleton should be fitted into makers.
There should be 34 makers when you put your skeleton into markers.
Step 6.
Marker Assign.
 Click “Auto-Assign”, markers will be assigned automatically base on your skeleton.
Step 7.
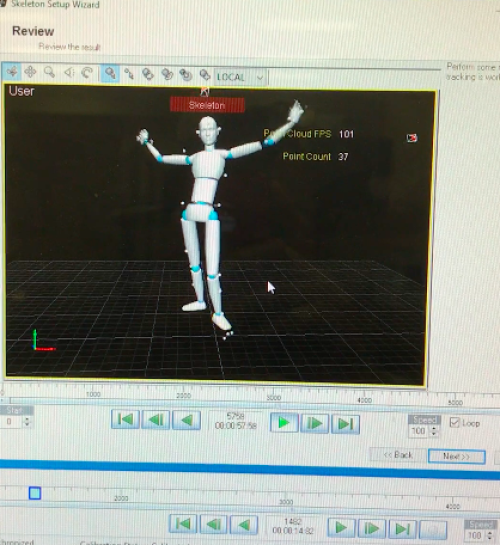
Review and Finish.

 Try to play the video that you recorded for creating skeleton and review your skeleton is working properly.
If there is no problem, click “Next” button and give name to skeleton that you created and click “Finish”.


