
Tutorial 2
On this tutorial you will learn how to access a specific pixel in an image , and how to read the properties of this pixel ( RGB value and position ).
I recommend you to type the code on your own to get familiarized with the program language. If you have trouble , the original code is attached bellow ( Running on Visual Studio 2015 + OpenCV 3.1 ) * Check the installation guide to make sure that you linked all the OpenCV modules to your Visual Studio.
Pixel Operations
<Code:c++ linenums:1> #include <iostream> #include <stdio.h> #include <opencv2/opencv.hpp>
using namespace cv; using namespace std;
Mat image;
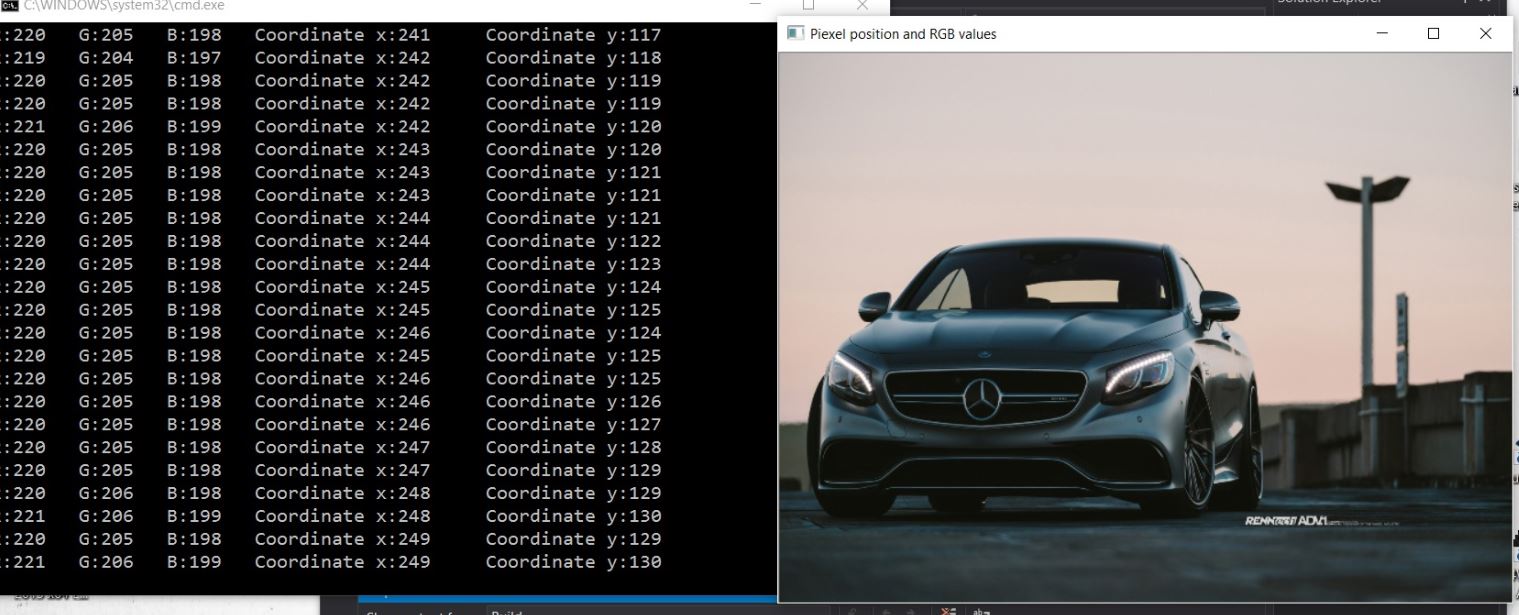
function to get the pixel RGB value at the given y column and x row
static void onMouse(int event, int x, int y, int f, void*) {
Vec3b pix = image.at<Vec3b>(y, x);
int B = pix.val[0];
int G = pix.val[1];
int R = pix.val[2];
cout « “R:” « R « “ G:” « G « “ B:” « B « “ \t”;
cout « “Coordinate x:” « x « “ Coordinate y:” « y « “\n”;
}
int main(int argc, char argv)
{
Read the image from your archive and resize
image = imread(“C:/Users/jcunhamatos/Desktop/s63.jpg”);
resize(image, image, Size(640, 480));
show the image in a window
imshow(“Pixel position and RGB values”, image);
use function setMouseCallback with our onMouse function to get the pixel properties
on the mouse pointer location
setMouseCallback(“Pixel position and RGB values”, onMouse, 0);
waitKey(0);
return 0;
}
</Code>
—-
===== Understanding the Code =====
Now that you have followed tutorial 1 , we already know how to open an image and how the program works. Lets analyze the new things on this tutorial.
<Code:c++ linenums:11>
function to get the pixel RGB value at the given y column and x row
static void onMouse(int event, int x, int y, int f, void*) {
Vec3b pix = image.at<Vec3b>(y, x);
int B = pix.val[0];
int G = pix.val[1];
int R = pix.val[2];
cout « “R:” « R « “ G:” « G « “ B:” « B « “ \t”;
cout « “Coordinate x:” « x « “ Coordinate y:” « y « “\n”;
}
</Code>
We can define a function to be called on the main program to get the RGB values (On OpenCV we always read BGR ) and the pixel's row(x) and column(y). “Vec3b” is the type of the pix variable , which will store the B[0], G[1] and R[2] color values from the image (which can be accessed using “.val[]“ ). The pix variable will receive the values from the Mat variable image - and using “image.at<Vec3b>(y, x)“ we assign the pixel values from the image variable at the position (y,x) - which is where the mouse is - to the pix variable. Creating three integer variables we can access what is stored on the pix vector using ”.val[]”. This function will be called using the “setMouseCallback” command on the main program. This function will not return any value , it will just print the values on the CMD window opened when you run the program. To display any variables on the CMD Window we use the “cout «“ command. If we want to display a text message we need to use ” “ , and if it is a variable we just put the variable name . To separate the string from the variables we use ” « “ .
—-
<Code:c++ linenums:36>
use function setMouseCallback with our onMouse function to get the piexel properties
on the mouse pointer location
setMouseCallback(“Pixel position and RGB values”, onMouse, 0);
</Code>
On the main program we call our onMouse function using the setMouseCallback . It will set the mouse handler for the first argument window (which we opened using the imread function ). On this case we don't set any event (just call if a certain mouse button is pressed ). If you want to call the function just in specific cases , you can find an example Here on the setMouseCallback section.
The video below will demonstrate the program in real time.