Table of Contents
Arena Construction for PFNav
Author: Michael Salinas Email: Salinm1@unlv.nevada.edu
Date: Last modified on 08/21/2016
Keywords: Arena Construction, Potential Fields

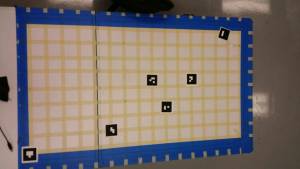
The photo above depicts the Arena that we used for our demonstration of potential fields.
Motivation and Audience
This is just a basic walkthrough as to how and why we made the arena the way it is. If one were to recreate this, that information is here.
The rest of this tutorial is presented as follows:
- Final Words
Parts List and Sources
To complete this tutorial, you'll need the following items
| PART NAME/DESCRIPTION | VENDOR | VENDOR Number or URL | PRICE | QTY |
|---|---|---|---|---|
| ScotchBlue Painter's Tape | Amazon.com | https://www.amazon.com/ScotchBlue-Painters-Multi-Use-70-Inch-60-Yard/dp/B00004Z4BB | $3.18 | 1 |
Construction
Step 1
Set Up your table wherever you want and Begin laying out tape to lay out the outer perimeter.
Step 2
Make sure you have enough room to place your tripod on top of the table. Alternatively you could have another table dedicated to just holding the tripod, or get a tripod that is tall enough to see your whole grid. As long as the grid is in frame, and each cell is equal it should be good.
Step 3
Set up the tripod so that the camera is high enough to see the whole table. You can use any USB camera, we used just a regular webcam camera for this project.

Final Words
The reason why we chose to make our arena like this, is because it was very easy to set up, and we weren't looking for a permanent display. If you want to make a more permanent display you could potentially fabricate your own using PVC or other materials.
For questions, clarifications, etc, Email: salinm1@unlv.nevada.edu
