Table of Contents
MM-UAV Arm Bluetooth Operation
Author: Dongbin Kim Email: akdba0207@gmail.com
Date: Last modified on 08/01/16
Keywords: Arduino, Bluetooth, Serial communication, Cpp, MM-UAV

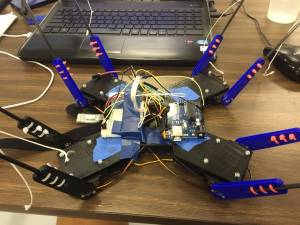
The photo above depicts MM-UAV arm bluetooth operation which allows you to manipulate the arm that you built up before this section via bluetooth. The big picture problem is that you can't control wirelessly with Pololu maestro servo controller. Solving this partially or completely is important because you will be able to control the arm to the direction that you want at a specific time. This tutorial shows you how to build it up with Arduino and takes approximately 2 hours to complete.
Motivation and Audience
This tutorial's motivation is to operate wirelessly. Readers of this tutorial assumes the reader has the following background and interests:
* Know how to write down Arduino sketch, Serial communication
* Perhaps also know how to understand Cpp language
* Perhaps additional background needed may include basic electrical engineering knowledge
The rest of this tutorial is presented as follows:
- Final Words
Parts List and Sources
US-based vendors to obtain material to complete this tutorial include Amazon.com.
To complete this tutorial, you'll need the following items. But I omitted the items from MM-UAV arm assembly because this page is to learn how to manipulate the arm wirelessly.
| PART NAME/DESCRIPTION | VENDOR | VENDOR Number or URL | PRICE | QTY |
|---|---|---|---|---|
| KEDSUM® Arduino Wireless Bluetooth Transceiver Module Slave 4Pin Serial + DuPont Cable | Amazon | https://www.amazon.com/KEDSUM%C2%AE-Arduino-Wireless-Bluetooth-Transceiver/dp/B0093XAV4U/ref=sr_1_2?ie=UTF8&qid=1468808002&sr=8-2&keywords=hc-06 | 9.99 | 1 |
| Arduino Uno platform | DASL Cabinet(you can easily buy it online) | 1 | ||
| Breadboard | DASL Cabinet(you can easily buy it online) | 1 | ||
| Electric wire | DASL Cabinet(you can easily buy it online) | 15 | ||
| Ni-Mh Battery(minimum 2.2A, 4.8V) | DASL Cabinet(you can easily buy it online) | 1 | ||
| Arduino Battery | DASL Cabinet(you can easily buy it online) | 1 |
Here is the list as a Google XLS document
Construction
This section gives step-by-step instructions along with photos to build up MM-UAV arm wireless operation
Step 1. Connect Servo motors, Arduino, Breadboard, Battery

Arduino Uno only supplies 6 PWM control pins(3,5,6,9,10,11) and if you connect more than 2 motors, pin 9 and 10 won't work, Since new MM-UAV arm design for current project uses 8 servo motors. and they are arranged in 4 pairs as well as aligned in parallel with each other. I decided to connect one of a pair on Arduino then we can manipulate MM-UAV arm with 4 PWM control pins.
Step 2. Bluetooth installation

Bluetooth operation is working much, much better in Android enviorment. Please download 'Bluetooth Controller' in Google market.

Click 'Set Keys' button and set up the button. 'Data of Key' stands for a data that the app will send Serial communication to Arduino. Make sure you write the same data as in Arduino sketch which is on the next section.
Step 3. Arduino Sketch
Please refer the Programming section to Sketch Arduino. If you understand Cpp language, you can easily understand the algorithms. When you are done building up Arduino Sketch, Compile the code and upload on Arduino.
WARNING - When you upload the sketch, make sure you take off the VC line(+) of battery for servos. Otherwise, you will encounter lots of operating errors.
Step 4. Bluetooth Settings

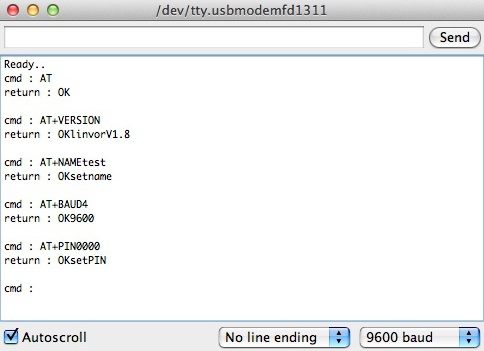
To set up the bluetooth for yours, you should know how to run AT(Attention) commands. AT commands help you check if bluetooth is connected or not, and help you change name, password, baud rate. The followings are basic AT commands language.
When you type the word at Sent on Serial display, you must check whether you have seen the received word.
1. Communications Test : *Sent : AT *receive : OK
2. Change baud rate : *Sent : AT+BAUD1 *receive : OK1200
*Sent : AT+BAUD2 *receive : OK2400
1 : 1200
2 : 2400
3 : 4800
4 : 9600
5 : 19200
6 : 38400
7 : 57600
8 : 115200
Baud rate setting can be save even power down.
3. Change Bluetooth device name: *Sent : AT+NAMEdevicename *receive : OKname (devicename is the name you want the device to be , and it will be searched with this name) Name setting can be save even power down.
4. Change Pincode:
*Sent : AT+PINxxxx
*receive : OKsetpin
(xxxx is the pin code you set)
Pin code can be save even power down.
Step 5. Bluetooth Operation

Once you are done setting up through AT Commands, Connect the power to Arduino and Motors. Then, click 'Scan' on Bluetooth Controller app, find the server to connect. In my case, the name of bluetooth was 'dbkdasl'
GOOD LUCK!
Programming
The goal of the code is to manipulate MM-UAV with bluetooth. It works in the following way
- mmuavarm.cpp
#include <SoftwareSerial.h>
#include <Servo.h>

int tx = 2; //input
int rx = 4; //output
int servopin1 = 5; //motor pin no.1
int servopin2 = 6; //motor pin no.2
int servopin3 = 3; //motor pin no.3
int servopin4 = 11; //motor pin no.4
String myString = "";
int ini1 = 120; //motor1 starting point
int ini2 = 45; //motor2 starting point
int ini3 = 20; //motor3 starting point
int ini4 = 60; //motor4 starting point
int angle1, angle2, angle3, angle4;
int pos1, pos2, pos3, pos4;
int goal1, goal2, goal3, goal4;
int dly = 120; //motor speed


Servo servo1; //definition with header
Servo servo2;
Servo servo3;
Servo servo4;


SoftwareSerial bluetooth(tx, rx);

void setup()
{
  Serial.begin(9600);
  delay(100);
  bluetooth.begin(9600);
  servo1.attach(servopin1);
  servo2.attach(servopin2);
  servo3.attach(servopin3);
  servo4.attach(servopin4);
  servo1.write(ini1 - 35); // 0 deg to 90 deg on Motor 1 is 120 deg to 30 deg
  servo2.write(ini2 + 35); // 0 deg to 90 deg on Motor 2 is 45 deg to 135 deg
  servo3.write(ini3 + 35); // 0 deg to 90 deg on Motor 3 is 20 deg to 110 deg
  servo4.write(ini4 + 35); // 0 deg to 90 deg on Motor 4 is 60 deg to 150 deg
  //start degree is 35 degree
}


void loop() {
  while (bluetooth.available())
  {
    char myChar = (char)bluetooth.read();
    myString += myChar;
    delay(5);
  }

  if (!myString.equals(""))
  {
    Serial.println("input value: " + myString);

    if (myString == "down") //if you click button "down"
    {
      int pos1 = servo1.read();
      int pos2 = servo2.read();
      int pos3 = servo3.read();
      int pos4 = servo4.read();
      int goal1 = 5; //all motor moves 5 degrees, if you make this number bigger, it moves bigger
      delay(dly);
      for (angle1 = 0; angle1 <= goal1; angle1 += 1)
      {
        servo1.write(pos1 - angle1);
        servo2.write(pos2 + angle1);
        servo3.write(pos3 + angle1);
        servo4.write(pos4 + angle1); //all motor moves 5 degrees downward
        delay(dly);
      }
    } else if (myString == "up") {

      int pos1 = servo1.read();
      int pos2 = servo2.read();
      int pos3 = servo3.read();
      int pos4 = servo4.read();
      int goal1 = 5;
      delay(dly);
     for (angle1 = 0; angle1 <= goal1; angle1 += 1)
      {
        servo1.write(pos1 + angle1);
        servo2.write(pos2 - angle1);
        servo3.write(pos3 - angle1);
        servo4.write(pos4 - angle1); //all motor moves 5 degree upward
        delay(dly);
      }

    } else if (myString == "go") {

      int pos1 = servo1.read();
      int pos2 = servo2.read();
      int pos3 = servo3.read();
      int pos4 = servo4.read();
      int goal1 = 5;
      delay(dly);
     for (angle1 = 0; angle1 <= goal1; angle1 += 1)
      {
        servo1.write(pos1 + angle1);
        servo2.write(pos2 + angle1);
        servo3.write(pos3 + angle1);
        servo4.write(pos4 - angle1); //all motor moves 5 degree forward
        delay(dly);
      }

    } else if (myString == "back") {

      int pos1 = servo1.read();
      int pos2 = servo2.read();
      int pos3 = servo3.read();
      int pos4 = servo4.read();
      int goal1 = 5;
      delay(dly);
     for (angle1 = 0; angle1 <= goal1; angle1 += 1)
      {
        servo1.write(pos1 - angle1);
        servo2.write(pos2 - angle1);
        servo3.write(pos3 - angle1);
        servo4.write(pos4 + angle1); //all motor moves 5 degree backward
        delay(dly);
      }

    } else if (myString == "left") {

      int pos1 = servo1.read();
      int pos2 = servo2.read();
      int pos3 = servo3.read();
      int pos4 = servo4.read();
      int goal1 = 5;
      delay(dly);
     for (angle1 = 0; angle1 <= goal1; angle1 += 1)
      {
        servo1.write(pos1 + angle1);
        servo2.write(pos2 - angle1);
        servo3.write(pos3 + angle1);
        servo4.write(pos4 + angle1); //all motor moves 5 degree left
        delay(dly);
      }

    } else if (myString == "right") {

      int pos1 = servo1.read();
      int pos2 = servo2.read();
      int pos3 = servo3.read();
      int pos4 = servo4.read();
      int goal1 = 5;
      delay(dly);
     for (angle1 = 0; angle1 <= goal1; angle1 += 1)
      {
        servo1.write(pos1 - angle1);
        servo2.write(pos2 + angle1);
        servo3.write(pos3 - angle1);
        servo4.write(pos4 - angle1); //all motor moves 5 degree right
        delay(dly);
      }

    } else if (myString == "stop") {
      servo1.detach();
      servo2.detach();
      servo3.detach();
      servo4.detach(); //all motor stop moving
    }
    myString = ""; //initialize variable myString
  }
}
Final Words
This tutorial's objective was to manipulate MM-UAV arms wirelessly with Bluetooth. Complete sketching Arduino perfectly for active wireless operation. Once the concepts were conveyed the reader could fly drones with the arm to do missions or draw more ideas for further research.
Speculating future work derived from this tutorial, includes Hose-Handling, UGV Cargo carry and etc. In the big picture, the problem of obstacles during the flight or being only able to be moved in limited area can be solved with this tutorial.
For questions, clarifications, etc, Email: akdba0207@gmail.com
