Table of Contents
Creating NXT LEGO Machines & Mechanisms in Solidworks Part 3
Author: Joo Won Lee Email: leej183@mit.edu
Date: Last modified on <6/14/2021>
Keywords: <Tutorial, how to, lego, Solidworks>


This tutorial will be focusing on how to make and use mechanisms that use belts, chains and links.
It assumes that the reader of this tutorial will know how to do basic mate & animate the lego pieces.
Please refer to Part 1 if the tutorial is too difficult to follow.
Motivation and Audience
The motivation of first part of this tutorial is to show how to build a belts, chains, and links in Solidworks. Chains/link mates can be notoriously buggy if not done properly. The animation will not work if proper gear mates with correct ratio is not specified.
While this tutorial covers the basics of it, the readers should experiment using different gear ratio values depending on their project. Good luck!
As links and chains take a lot of computational and graphical power, it is suggested that one uses a rather powerful computer to avoid lags and stuttering.
Parts List and Sources
Before the tutorial can begin, one must download the following items from google drive. Follow instructions from part 1 on how to use the files.
| File Name | Google Drive Link | Note |
|---|---|---|
| Isogawa Solidworks Parts | https://drive.google.com/file/d/1KvLF4l2abW-GGuO1T0vRRLwzHVT3o4dG/view?usp=sharing | Ask author or lab member for password |
| Isogawa Book Parts List | https://drive.google.com/file/d/1HDJ3HF7Dj-EgmrfUnNSEUs-qo3hrSzzq/view?usp=sharing | Not all parts are all accounted for |
How to Create a Belt Mechanism
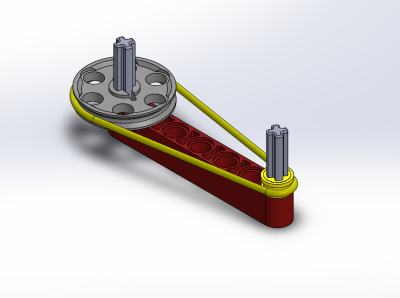
This section will show how to assemble belt mechanism.
Belt in reality, remains stationary as a solid piece in Soldiworks motion animation, which is why it is simple to make.
Assembly Video
Creating belt as a new part is the key when using a belt mechanism.
Solidworks treats the belt like a new piece and will save it on the folder where the assembly file is located.
Input the thickness of the rubber band (around 1.5mm), and Solidworks will automatically adjust the belt dimensions.
Use swept function to create a circular belt with a diameter you specified.
How to Create a Chain Mechanism
This section will show how to assemble chain mechanism.
Compared to belts, chain/links are much more complicated and just…. weird….
Since the lego gear pieces are not aligned 100% perfectly with chains (they are plastic so they can stretch a little in real life), sometimes animations will fail. Also chains may not be all connected depending on the length.
One needs to fidget around with gear ratios between gears and chains when doing gear mating.
Multiple trials will be needed to find the optimized gear ratios….
It is suggested that using the number of gear teeth (24 in this case with diameter of 24.5mm) will result in best animation. However, it may not be true for all cases…
Assembly Video
Make sure to measure the thickness of the gear to make a plane in the middle.
In the video, the thickness of gear is 8mm, which is why I created a 4mm plane to place the belt drawing in the middle.
Once the belt drawing is created, make sure to identify a midplane of the chain to correctly place it on the belt.
Error in Animation
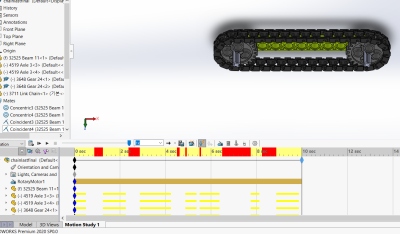
There may be error like these when creating animation.

This red bar means that the Solidworks animation cannot calculate the rotation of the gear along with the chain. The segmented yellow lines occur when chains are not moving.
What is happening is that the gear or the chain is slipping due to the wrong gear ratio set in place.
As mentioned above, our lego piece designs are not perfectly optimized for gears and chains. Since plastic in reality can stretch and be able to fit much more nicely.
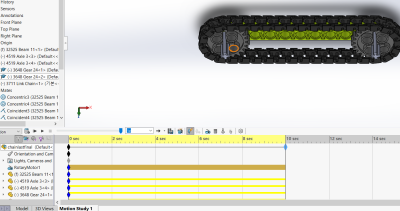
One should find a correct gear ratio to get rid of those red bars and segmented yellow lines.
One method is inputing gear ratio of # of gear teeth and finding a correct diameter of the belt drawing by slowly increasing and testing it over and over again…

The above image shows a correct animation profile. It does not have any red bars or segmented yellow lines.
Final Words
This tutorial went over the following tasks:
-How assemble belt and chain mechanisms.
-How to use belt & chain function.
-How to animate belt & chains.
For questions, clarifications, etc, Email: leej183@mit.edu
