Table of Contents
Laser cutting a name plate
Author: Jihyun Lee Email: ljh11110000@gmail.com
Date: Last modified on 09/19/2018
Keywords: name plate, laser cutting

The photo above depicts the format of text for the name plate. This tutorial shows you how to make the same nameplate to the existing nameplates and takes approximately 30 minutes to complete.
Motivation and Audience
This tutorial's motivation is to teach the students to make a identical nameplates. Readers of this tutorial assumes the reader has the following background and interests:
* Know how to use inkscape
* Perhaps also know how to apply new font
* Perhaps additional background needed may include how to use the laser cutter
* This tutorial may also attract readers who uses acrylic
The rest of this tutorial is presented as follows:
- Final Words
Parts List and Sources
To complete this tutorial, you'll need the following items
| PART NAME/DESCRIPTION | VENDOR | VENDOR Number or URL | PRICE | QTY |
|---|---|---|---|---|
| Clear acrylic board | Amazon.com | https://www.amazon.com/Source-Thick-Inches-Acrylic-Plexiglass/dp/B004DYW31I/ref=sr_1_3?ie=UTF8&qid=1537380279&sr=8-3&keywords=acrylic+board | 7.99 | 1 |
| Black acrylic paint | Amazon.com | https://www.amazon.com/Stuart-Semple-mattest-flattest-acrylic/dp/B0758GKKGZ/ref=sr_1_1_sspa?s=arts-crafts&ie=UTF8&qid=1537392294&sr=1-1-spons&keywords=black+acrylic+paint&psc=1 | 19.99 | 1 |
| Silver acrylic paint | Amazon.com | https://www.amazon.com/Jacquard-Lumiere-Metallic-Acrylic-Ounces-Metallic/dp/B001DKOHXW/ref=sr_1_3?s=arts-crafts&ie=UTF8&qid=1537392364&sr=1-3&keywords=silver+acrylic+paint | 5.96 | 1 |
| Pin | Amazon.com | https://www.amazon.com/YazyCraft-Round-Straight-Black-count/dp/B015FH9SR8/ref=sr_1_2?s=arts-crafts&ie=UTF8&qid=1537392421&sr=1-2&keywords=round+pin | 7.99 | 1 |
Construction
This section gives step-by-step instructions along with photos to make the nameplate.
Step 1 : Preparing
1. Check the spelling of person's name. Optionally, the person's title could be needed.
2. Measure the height and width of existing nameplate.
3. Prepare a clear acrylic board.
Step 2 : Designing
Use the inkscape in order to make the design for the text and the rectangle edge of the nameplate. It is important to make separate files for the text and rectangle. If you don't have any knowledge about the inkscape you can check inkscape tutorial in the wiki page.External Link


<First file : Rectangle edge>
Simply use the tool to make a rectangle and set the height and width. Use the same length of existing nameplates.

<Second file : Text>
1. Firstly, make the same sized rectangle again and then write the text. A rectangle is required to easily cut the name in the middle of the plate when you use the laser cutter.
2. Copy the format of the image to write the text.
For the name, use helvetica font, size 36. You can use a smaller size if the number of letters of the name is more then 17.
For the title, use hevetica font, size 18 and place it right side, right under the name.
3. After the text is written, make sure to place it in the middle of the rectangle. The ruler tool could be helpful.
Step 3 : Cutting
It is important to cut the edge and text separately. The depth of the edge and text are different. For more information about laser cutter you can check the wiki tutorial. External Link
1. Firstly, open the rectangle file and cut the edge. Repeat the cutting until the acrylic board is fully cutted.
2. After you have cut the edge and are ready to put the name on it, open the name file and change the power of the laser cutter to 10~18.
3. The starting point will be the same. For the name cut the text for only one time.
Step 4 : Painting

1. Wash out the powders made by the laser cutter. Use the sponge to fully remove it.
2. Use black acrylic paint to paint the text. Don't use the thin brush to paint each the letter.
3. Just pour a certain amount of paint all over the text and spread it. And let it dry 50~70%.
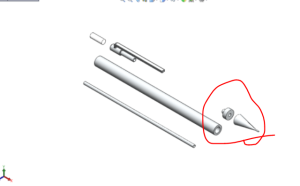
4. When it is 50~70% dried, prepare a sharp-edged tool to scratch the paint which is on the unneeded parts of the surface. I used the disassembled part of the mechanical pencil to remove the paint.
5. Repeat until the letters are fully covered with the paint.
Step 5 : Attaching

1. Use the pin to hold the nameplate.
2. Color round part with the silver paint and let it dry for more than 1 hour.
Final Words
For questions, clarifications, etc, Email: ljh11110000@gmail.com
