Table of Contents
LabVIEW Basic Elements
Author: Yu Hang He Email: hey6@unlv.nevada.edu
Date: Last modified on <07/24/17>
Keywords: LabVIEW, Tutorial, Installation, Examples, Exercises

The photo above depicts a software called LabVIEW which was developed by National Instruments as a system-design platform and visual programming language environment. LabVIEW simplifies hardware integration and allows you to gain rapid access to data acquisition and visualization. Furthermore, as a visual programming language, LabVIEW simplified many programming processes associated with hardware. This tutorial will cover LabVIEW installation guide, basic elements, and some simple programming examples and takes approximately 4 hours to complete.
Motivation and Audience
The tutorial serves as an introduction to LabVIEW programming process and aim at covering basic elements. Readers of this tutorial assumes the reader has the following background and interests:
* Know basic elements of programming process
* Perhaps have experience with text-based programming language
* Have Window OS and educational email account
* Interests in graphical programming language
The rest of this tutorial is presented as follows:
Installation Guide
Section 1.1: Register Account
First step is to create a free National Instruments account. Follow this link https://lumen.ni.com/nicif/create.xhtml to create an account. Remember to enter an educational email address to activate 6-months LabVIEW Student Edition later. You will need to confirm your email address.
Section 1.2: Request Serial
Next step is to register for LabVIEW Student Edition. This license works for Window OS only. Follow this link https://forums.ni.com/t5/Projects-Products/Free-6-Month-Evaluation-of-LabVIEW-Student-Edition-for-at-home/ta-p/3497362 to request a license.

Click on the “I AGREE, Request serial” will lead to a new webpage with your serial number and instructions for next step. Remember to note down the serial number. The serial number and activation code is also send to your registered email.
Section 1.3: Download Software
Follow the “Download Software” link or this link http://www.ni.com/en-us/shop/labview/download.html to download LabVIEW. Click on “EXISTING USERS” tab and choose “FULL UNIVERSITY ACCESS” version. Download the NI Student Edition Software installer. If you are going to work with LEGO MINDSTORMS NXT/EV3, download the 2016 Version, which have the option to include LabVIEW Modules for LEGO MINDSTORMS.
Section 1.4: Activate Product
LabVIEW Student Edition can be activated during installation or through NI License Manager.

During installation choose first option as shown above.

Enter serial number to activate LabVIEW Student Edition.

Check all the packages that you will need. If you are going to work with LEGO MINDSTORMS, installed the LabVIEW 2016 Module for LEGO MINDSTORMS.
Alternatively, you can use NI License Manager to activate LabVIEW Student Edition. Open NI License Manager, which was included during LabVIEW installation, and click on “Active Software”.

Enter your serial number to activate LabVIEW 2016 or 2017 Student Edition. Alternatively, you can click on “Enter Activation Codes” to enter activation code, which should have been sent to your email.
Basic Elements
You have successfully installed and activated LabView Student Edition, it is time to learn some basic elements of LabVIEW.
Section 2.1: Creating VI
A program created through LabVIEW is called VI, or Virtual Instrument. A VI is consisted of two components: Front Panel and Block Diagram. Front Panel is similar to console or terminal in text-based programming. It is a graphical user interface where users can input data information and where result of program is displayed. Block Diagram is the workbench for working with underlying visual-based programming.

When you first open LabVIEW, click on “Create Project”. For this tutorial, you can simply choose “Blank VI” as template. After clicking “Finish,” two windows should appear: Front Panel and Block Diagram.
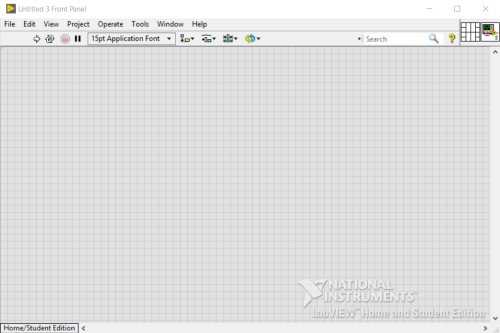
Front Panel
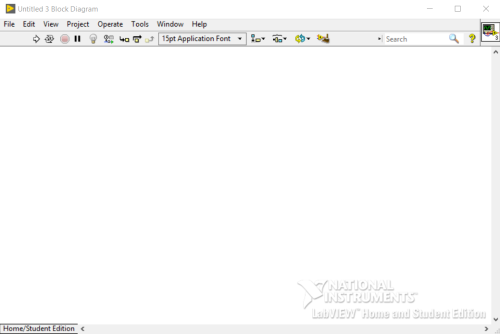
Block Diagram
If only one window appears, click on “Window” ⇒ “Show Block Diagram” or “Show Front Panel.”
Section 2.2: Front Panel
Front Panel is a graphical user interface that resembles terminal or console from textual programming. There are two types of objects that you can create on Front Panel: Controls and Indicators. Controls are responsible for user input to the VI. They resemble text box, switch, button, etc. to simulate different types of data. Indicators display result or output of program back to users. They are in the form of graphs, tables, and charts. To access controls and indicators, simply right-click on the Front Panel.
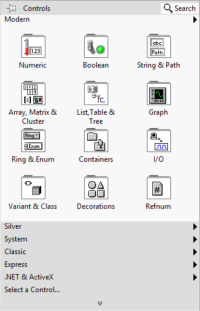
The Control Palette menu will appear with controls and indicators categorized according to data types. For more information on different type of controls and indicators, visit this link http://zone.ni.com/reference/en-XX/help/371361K-01/lvconcepts/fp_controls_indicators/
For example, let’s choose string indicator under String & Path category and place it anywhere on the Front Panel.
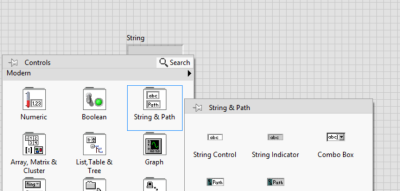
You can resize and reposition the string indicator and edit the labeling by double clicking the text.
Section 2.3: Block Diagram
The Block Diagram is an integrated development environment for developing VI. Block Diagram contains four basic elements: terminal, node, constant, and wire.
Terminals are visual representation of controls and indicators you created on Front Panel.

You may have noticed that a string terminal appeared after creating the string indicator. Each control and indicator will have its own terminal. Terminals are pathways between Front Panel and Block Diagram. You can receive inputs from control terminals and output results through indicator terminals.
Nodes are visual representation of functions, statements, and operators. To access nodes, right-click on the Block Diagram.
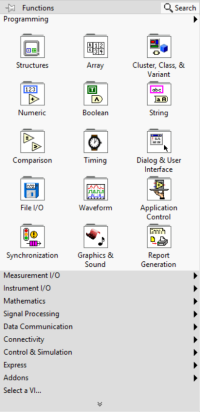
A Function Palette appears with nodes organized according to their purpose. Some examples of nodes include mathematical operations, comparison, for loop, and while loop.
Constants are user or system defined variables of specific data types, for example, integer, string, array. There are also universal constants that you can use. Let’s create a constant with string data type.
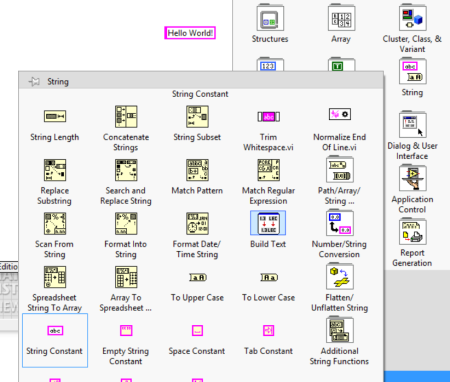
Right-click on Block Diagram to open Function Palette. Hover your mouse over string category to open string submenu. Click on String Constant, place it on the Block Diagram and type in “Hello World!” in the text box.
Wires are responsible for transferring data between elements of Block Diagram. Every element in Block Diagram have at least one connector that can be wired for input or output.
To understand the I/O of an element, hover your mouse over an element. Connectors that appeared on left side indicate inputs while right side connectors indicate outputs.
String constant have an output connector while string indicator terminal have an input connector.
To wire the two elements together, click on connector of one element. Your mouse pointer will change into a spool and a black dotted wire will follow your mouse. Now click on the second element to connect the wire.

For more information on different elements of Block Diagram, visit this link http://zone.ni.com/reference/en-XX/help/371361K-01/lvconcepts/block_diagram_objects/
Section 2.4: Execute and Debug Tool
To execute the program, click on the run button in the tool bar on top of Front Panel or Block Diagram.

The first button is run command, which only execute program once. The second button is run continuously command. The third button is stop command and final button is pause command. The first 4 commands is available on toolbar from both Front Panel and Block Diagram.
After executing the program, the message “Hello World!” should be displayed in your string indicator.

Congratulation on your first program in LabVIEW!
LabVIEW includes some very useful debugging tools. The fifth button on the Block Diagram toolbar is highlight execution command which highlight every function as it is being executed. The sixth button is retain wire values command which will display values as it is being transferred from one element to the next. The seventh button is start single stepping command which will pause program at every execution. Double click on blank space in Block Diagram to create a comment.
LabVIEW also included an extensive help manual that users can access at any time. The help manual is on the top toolbar. Click Help, then “LabVIEW Help”.

The “Show Context Help” option will toggle on a window that will display tip and description for objects you are currently hovering over.
Examples and Exercises
Now that you have learned basic elements of LabVIEW, let’s try some examples and exercises.
Section 3.1: Mathematical Operations
For this exercise, create a program that add, subtract, multiple, and divide two numbers provided by user and display the results.
On the Front Panel, you will need two numeric controls for user inputs and four numeric indicators to display the results.
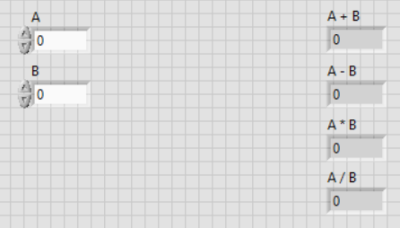
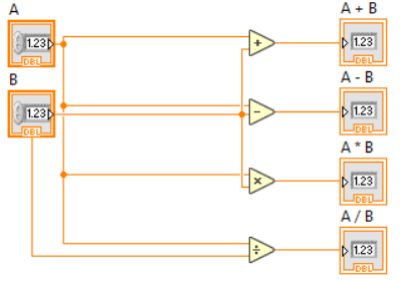
On the Block Diagram, place four function nodes that will be used for math operations: add, subtract, multiply, and divide. The nodes are available in Function Palette under numeric category.
Click on an existing wire to create a joint. Joints allow one value to be passed to multiple elements. Create multiple joints to pass values to each function node. Right click on a wire and choose “Clean Up Wire” to organize wire to improve readability.
Exercises:
- Convert temperature from Fahrenheit to Celsius.
- Calculate volume of sphere based on radius.
Section 3.2: Case Structure
Building on the previous example, what if you want users to choose which operation they want to perform. In this type of situation, you need conditional statements, or case structures. A conditional statement is only executed when the condition is met. Case structure in LabVIEW is similar to if-else statement or switch case in text-based programming.
Open Function Palette and case structure can be found under structures category.
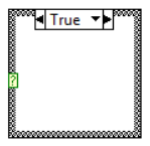
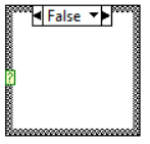
The default condition for case structures is true or false condition. You can toggle between conditions by clicking left or right arrow. You can pass the Boolean condition to the case structure through wiring.

For example, create a Boolean switch on the Front Panel. Then, connect the switch terminal to case structure through the “?” symbol on the border (The default position of switch is false).
When a condition is met, only statement within case structure will be executed. You need separate statement for different conditions. To pass a value to case structure, connect a wire from the element to border of case structure.

A square will appear on the border of case structure. This process is called tunneling. You can output values from case structure in the same fashion by tunneling first.
This example has four conditions that must be considered: add, subtract, multiply, and divide. A true or false condition is inefficient. For these cases, LabVIEW allow you to pass values of five data types as conditions for case structure: Boolean, error cluster, integer, enum, and string.

For this exercise, create a string control on Front Panel that will allow users to enter operation they wish to perform. You only need one numeric indicator to display the result.
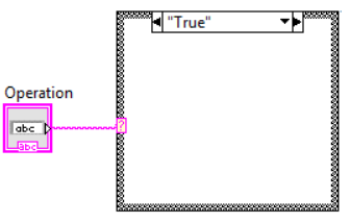
Connect the string terminal to case structure. Now, case structure will accept string values as conditions. Click on case structure’s text box to edit the condition. To add a new case, right click on case structure, then choose “Add Case After”. For case structure in LabVIEW, you will always need to set a default case. The VI will execute default case if it does not recognize the condition. Right click case structure during condition you want to set as default, then choose “Make This The Default Case”.
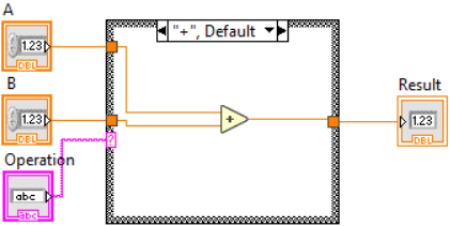
Edit the condition to check whether “+”, “-”, “*”, or “/” was entered in operation, then create a case for each operation. You have just created a simple calculator in LabVIEW.
For more information on case structure, visit this link http://zone.ni.com/reference/en-XX/help/371361K-01/glang/case_structure/
Exercises:
- Create a program to determine maximum or minimum of three number based on user choice.
- Create a program to determine if a number is odd or even.
Section 3.3: While and For Loops
The ability to repeat a process until certain condition or for certain number of times is fundamental to any programming process. LabVIEW provide while loop for repeat a block of code until a condition and for loop for set number of repetition.
Building on previous example, you can improve on the program to run continuously without help of toolbar.
Setup a stop button on the Front Panel which is in Boolean category of Control Palette menu.

Create a while loop to encompass the entire block of code. Wire the stop button to loop condition to stop the while loop. Now the calculator will update continuously until stop button is pressed.
An useful function of while and for loop is shift register. Shift register allow you to pass value from one repetition to the next. Right click on the structure and choose “Add Shift Register.”
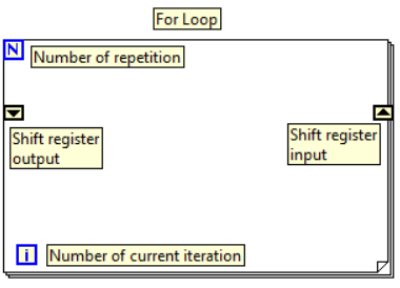
Wire the value you want to pass through shift register input and the value will return at output during next repetition.
Example: Write a program that calculates factorial from user input using for loop and shift register.
Factorial is product of integer and all the integer below it. For example, factorial of 4 (!4) is 1 * 2 * 3 * 4 = 24. Try using highlight execution and retain wire values function to help with debugging process.
Here is one example of solution.
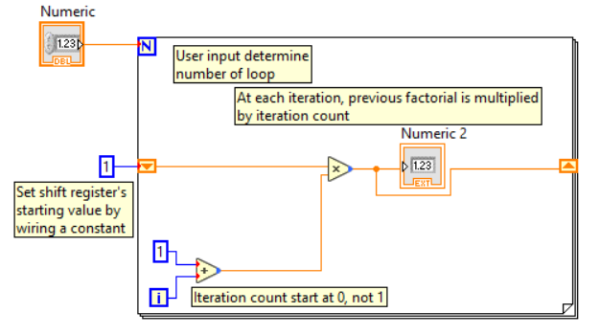
You may notice that for factorial of integers greater than 12, the answer is incorrect. That is because function nodes are not configured to handle calculation of that degree of precision. To change precision, right click on the nodes, then choose “Properties”. On the Output Configuration tab, change representation icon to Double Precision or Extended Precision.
Exercises:
- Create a program to determine if a number is prime or not
- Create a program to display Fibonacci Sequence.
Final Words
The purpose of this tutorial was to introduce reader to some of the fundamental elements of LabVIEW. The tutorial included installation guide for LabVIEW Student Edition and examples and exercises that will further improve reader’s understanding of LabVIEW programming process. After following through with the tutorial, reader should be able to create simple VI and know where to find more resources for help.
To gain more understanding of LabVIEW, you can also follow National Instruments’ more detailed tutorial at this link http://www.learnni.com/
For questions and comments, email hey6@unlv.nevada.edu
