Table of Contents
Building a Webcam-based Laser Rangefinder
Author: Blake Hament Email: blakehament@gmail.com
Date: Last modified on 08/09/16
Keywords: tutorial, rangefinder, webcam, laser, LIDAR, opencv, Cpp
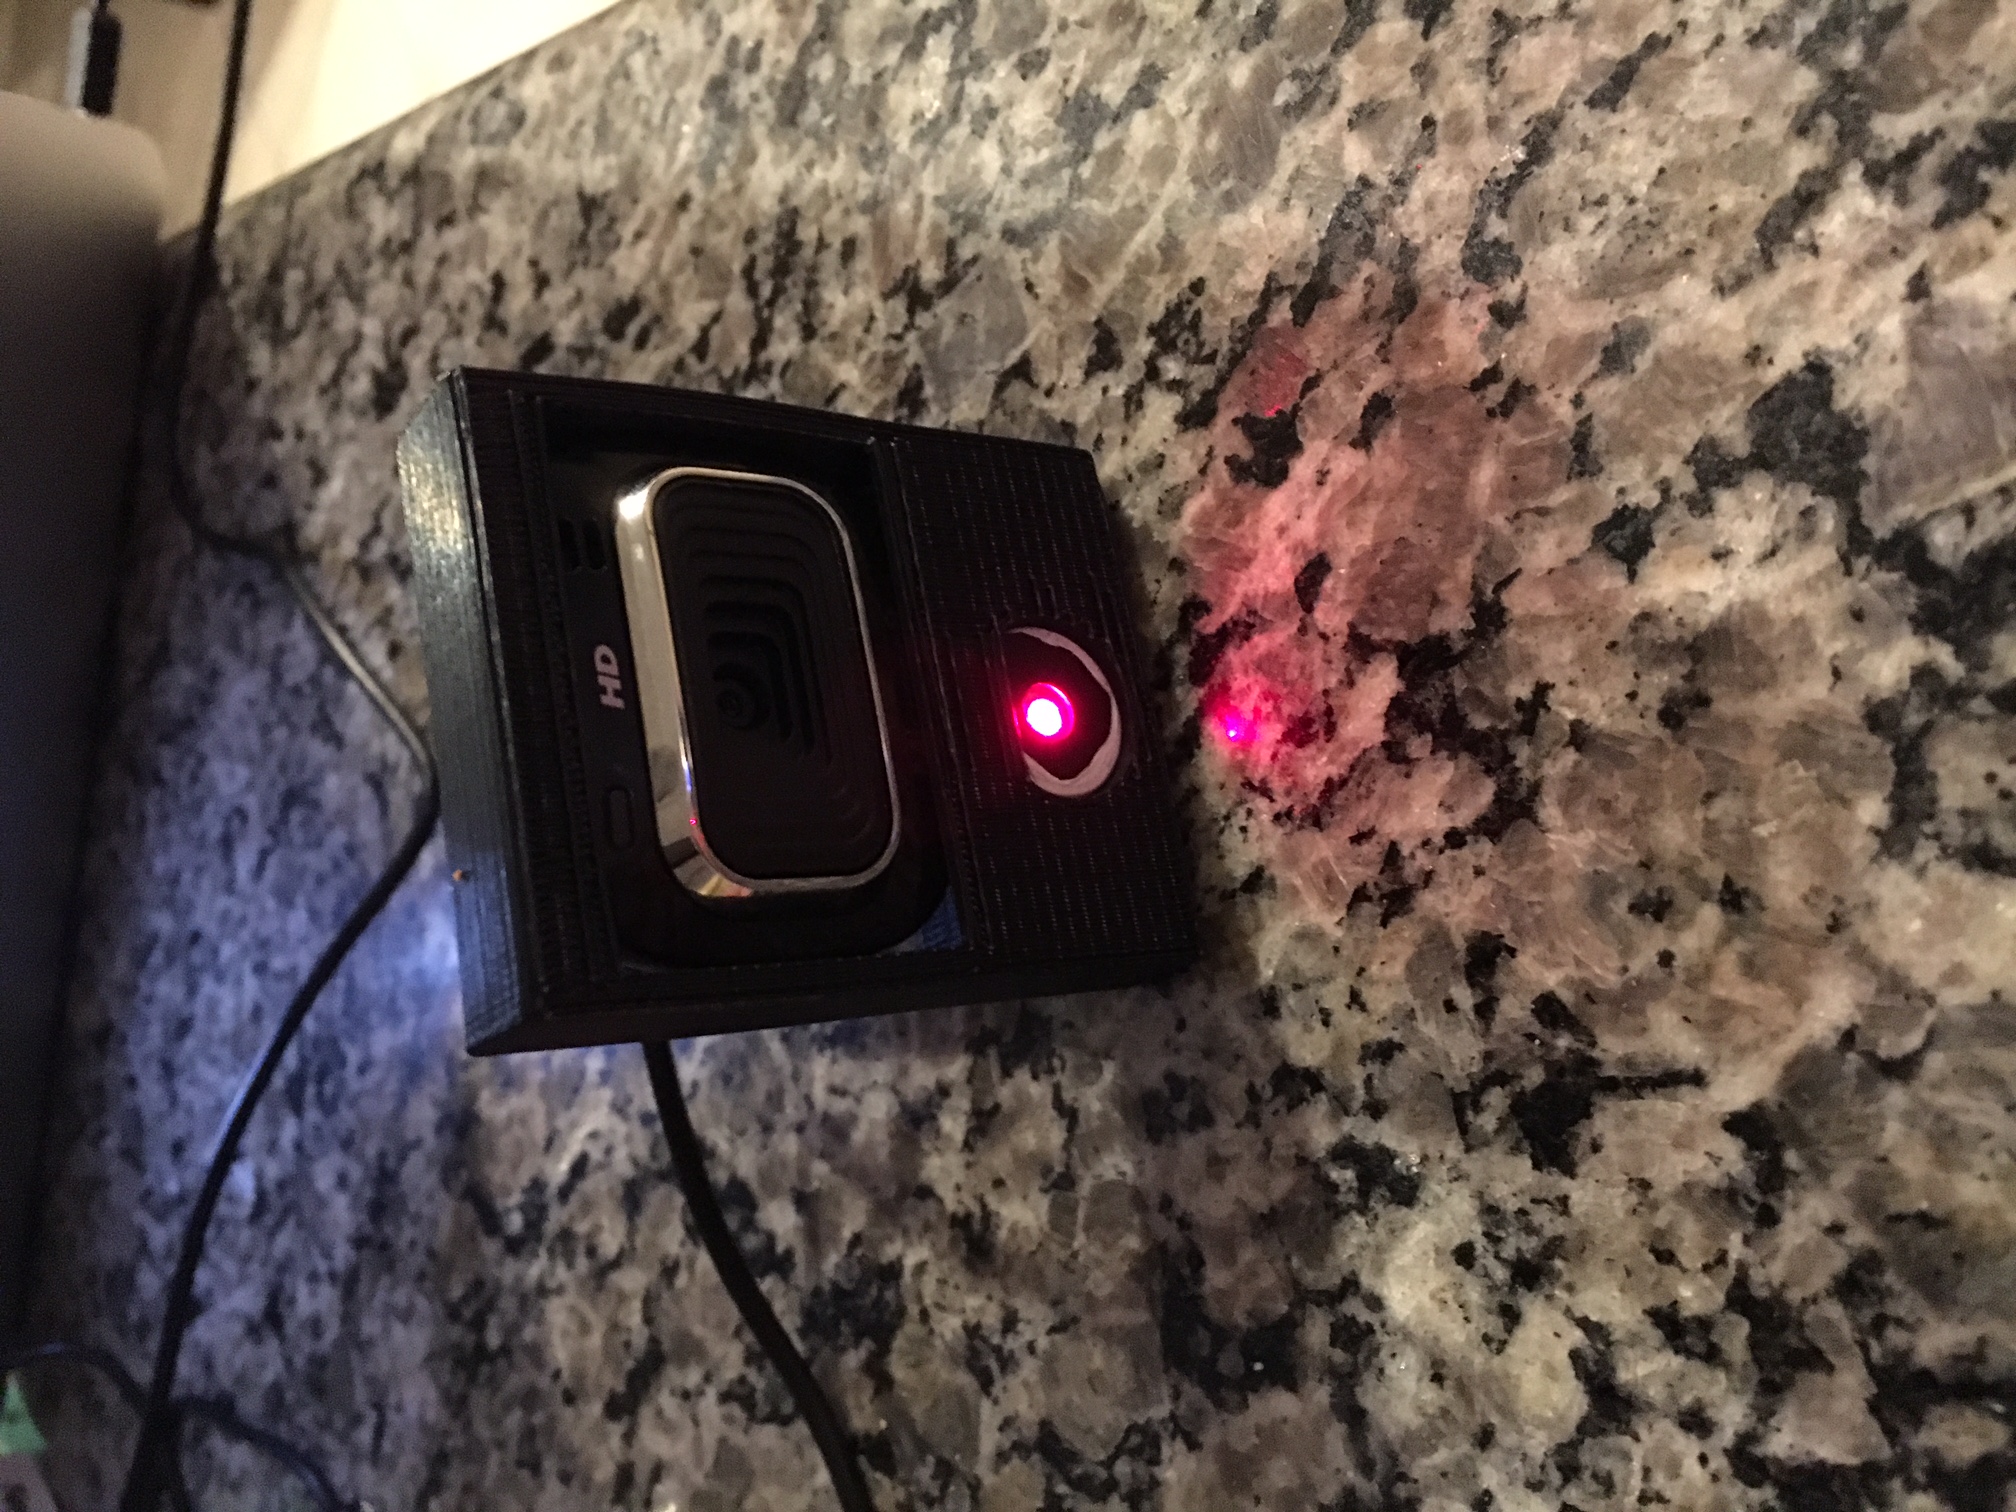
This tutorial will guide you through the development of a webcam-based laser rangefinder, my final version is depicted below. Taking on this project will help to familiarize you with some of the basic principles of computer vision and laser sensors. These principles are the basis for more complex LIDAR and image capture strategies which are used for control feedback in many robotic systems.
My tutorial builds on the work done by Todd Danko in this tutorial: https://sites.google.com/site/todddanko/home/webcam_laser_ranger
Motivation and Audience
This tutorial will guide you through the construction of a webcam-based laser rangefinder. A rangefinder is a tool for detecting distance, and it can be integrated into an autonomous system to provide information about a robot's environment. This rangefinder is cheap to construct and easy to integrate into existing autonomous systems.
I assume the reader has the following background and interests:
- Basic skills in Cpp and bash coding
- Some knowledge in trigonometry and statistical regression
- Interest in engineering, autonomous systems, and computer vision
The rest of the tutorial is organized as follows:
- Parts List and Sources
- Theory of Operation
- Construction
- Programming
- Calibration
- Final Words
Parts List and Sources
I ordered the essential materials for this project from amazon.com and used a 3D printer to create the ABS plastic housing. If you do not have access to a 3D printer, you can use cardboard and tape to secure the webcam and laser (see Todd Danko's tutorial https://sites.google.com/site/todddanko/home/webcam_laser_ranger).
| PART NAME/DESCRIPTION | VENDOR | VENDOR Number or URL | PRICE (USD) | QTY |
|---|---|---|---|---|
| Microsoft Lifecam HD-3000 | Amazon.com | https://www.amazon.com/Microsoft-LifeCam-HD-3000-Webcam-T3H-00011/dp/B008ZVRAQS | 24.94 | 1 |
| Vokul Hot Tactical Red Laser Beam Dot Sight Scope | Amazon.com | https://www.amazon.com/Vokul-Tactical-Laser-Pistol-Picatinny/dp/B00X356WZQ | 10.99 | 1 |
Other webcams and laser pointers can be substituted without concern.
Theory of Operation
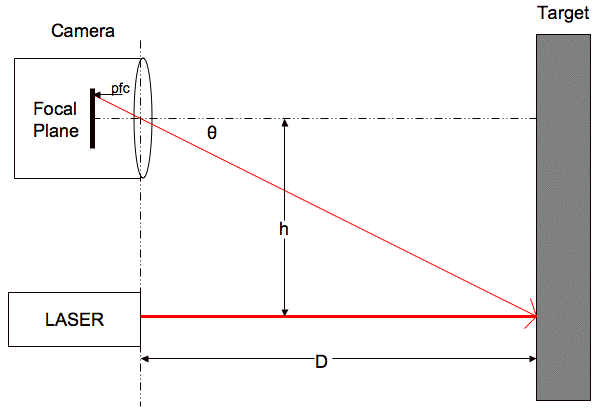
As illustrated above, the rangefinder emits a laser beam that bounces off the target and travels to the webcam, creating a triangle. The distance “D” from the rangefinder to the target can be calculated using simple trigonometry. “D” depends on two values: the distance “h” between webcam and laser and the angle “θ” of the laser beam incident on the webcam relative to it's initial path.
The values are related as follows
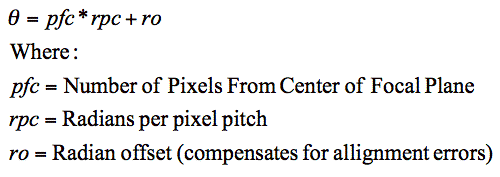
“h” is fixed and simple to calculate, but “θ” is calculated
Resulting in the equation
Note: In this tutorial I will perform these calculations using opencv image coordinates rather than pixel coordinates, but the theory remains the same.
Construction
Step 1
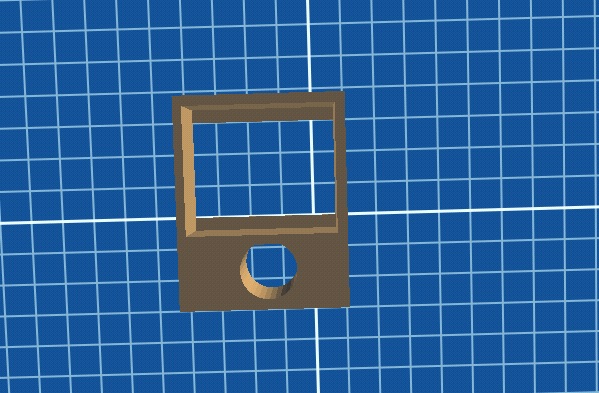
It is important that the webcam and laser always maintain a constant distance “h” and fixed, parallel orientation. To achieve this, I 3D printed a simple ABS plastic housing. Download my STL file here https://www.dropbox.com/s/hgwbnsd2o3mr8o0/WCRF_Housing.stl?dl=0
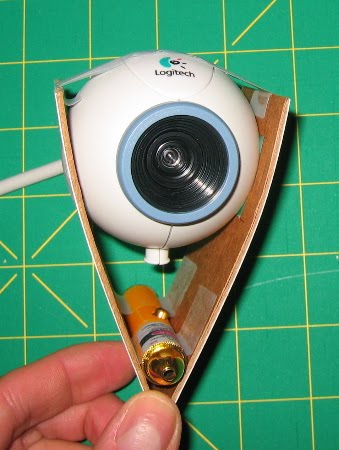
If you are using a different webcam or laser, you will need to design a similar housing adapted to your components. Alternatively, you can use cardboard and tape to secure the webcam and laser at a constant distance and orientation as picture below.
Step 2
In early tests of the rangefinder, I found that any shifting of the webcam or laser in the housing required recalibration of the entire instrument. To avoid this, I used plumbing tape to ensure fixed positioning. Use any type of appropriate adhesion to secure the components.
Programming
The programming for this rangefinder is done in Cpp and relies on opencv functions. I operated the rangefinder with a Macbook Air, and I used cmake to build and compile. The following tutorial describes how to install, build, and use opencv with cmake on OSX http://blogs.wcode.org/2014/10/howto-install-build-and-use-opencv-macosx-10-10/.
My full program and cmake files can be found here https://www.dropbox.com/s/2rcizqe3coexv40/ThreshBlurBlob.cpp?dl=0
The program does the following:
1. Imports an image from the webcam
src = imread( argv[1], 1 );
src is the matrix in which the pixel information is stored from the original image
2. Converts image to grayscale
cvtColor( src, src_gray, CV_BGR2GRAY );
src_gray stores the converted image information
3. Thresholds the image to isolate laser beam
threshold( src_gray, thr, threshold_value, max_BINARY_value,threshold_type );
thr stores the thresholded image information
You can play around with the thresholding variables to better isolate the laser beam, see below for my values
//Thresholding variables
int threshold_value = 245;
int threshold_type = 0;
int const max_value = 255;
int const max_type = 4;
int const max_BINARY_value = 255;
4. Blurs image to remove noise
GaussianBlur( thr, blr, Size(9, 9), 2, 2 );
blr stores the blurred image information
5. Uses opencv blob detection function to identify coordinates of center of laser beam
First you need to set up the parameters you will use for blob detection
// Setup SimpleBlobDetector parameters.
SimpleBlobDetector::Params params;
// Change thresholds
params.minThreshold = 1;
params.maxThreshold = 255;
// Filter by color
params.blobColor = 255;
// Filter by Area.
params.filterByArea = true;
params.minArea = 10;
params.maxArea = 2500;
// Filter by Circularity
params.filterByCircularity = true;
params.minCircularity = 0.9;
// Filter by Convexity
params.filterByConvexity = false;
params.minConvexity = 0.87;
// Filter by Inertia
params.filterByInertia = false;
params.minInertiaRatio = 0.1;
I did not need to filter by convexity or inertia, but I have included it in the code in case you are detecting false signals and need to improve filtering.
// Storage for blobs
vector<KeyPoint> keypoints;
// Set up detector with params
SimpleBlobDetector detector(params);
// Detect blobs
detector.detect( blr, keypoints);
The center of each detected blob will be passed to the vector “keypoints”.
6. Calculates distance from target using displacement of laser beam center from image center
// Get x, y coordinates of blob
float x = keypoints[0].pt.x;
float y = keypoints[0].pt.y;

//Get displacement of laser beam center from image center
float centerx = src.cols/2;
float centery = src.rows/2;
float dispx = centerx - x;
float dispy = centery - y;
Once you have the y image coordinate of the center of the laser beam, you can calculate distance using the function you derive during calibration (see the following section).
float dist = .000773 * pow(dispy,4) - .036 * pow(dispy,3) + .623 * pow(dispy,2) - 4.612 * dispy + 13.653;
7. Returns original image with distance, laser coordinates, and crosshairs overlaid
//Draw crosshairs
line( src,  Point(x, 0), Point(x, 426),  Scalar( 110, 210, 0 ),  2,   8 );
line( src,  Point(0, y), Point(640, y),  Scalar( 110, 210, 0 ),  2,   8 );

//Put text
std::string cord1 = "Laser Coordinates: (" + to_string(x) + ", " + to_string(y) + ")";
std::string cord2 = "Distance: " + to_string(dist);
putText(src, cord1, Point2f(100,100), FONT_HERSHEY_PLAIN, 1,  Scalar(0,0,255,255), 2);
putText(src, cord2, Point2f(100,150), FONT_HERSHEY_PLAIN, 1,  Scalar(0,0,255,255), 2);
// Display image with overlays
imshow("Rangefinder", src );
waitKey(0);
Calibration
To calibrate the rangefinder, we need to take pictures at various known distances. I used a professional laser rangefinder to measure distances, but a tape measure would provide acceptable measurements as well.
Because the laser and webcam are aligned vertically, the laser beam should remain at the same x coordinate in all webcam images. At increased distances, the y coordinate of the laser beam in the captured images will be closer to the center of the image. In other words, the displacement of the laser beam from the center of the image increases when the rangefinder is operated at shorter distances.
Above is the scatterplot showing the y coordinates of the detected laser beam versus the distance at which the image was captured for my measurements. Also pictured is the 4th degree polynomial curve of best fit. The curve of best fit gives the distance of the point of reflection from the rangefinder as a function of the y coordinate of the laser beam in the captured image.
Note!! In the chart above, we see that the fit is only good for the range of distances [1.5,8]m. I will constrain use of my rangefinder to this range.
In my cpp script, I set the variable I will use for distance output equal to the function for the curve of best fit as follows
float dist = .000773 * pow(dispy,4) - .036 * pow(dispy,3) + .623 * pow(dispy,2) - 4.612 * dispy + 13.653;
Now the rangefinder is ready for operation.
Final Words
Further work could include revising the program so that the webcam captures video, applies the beam detection and distance calculations to individual frames, and then outputs the distance in real-time. This would allow for seamless integration into an autonomous vehicle's control feedback processing. I would also like to improve the design of the 3D printed housing such that any wiggling of the webcam and laser are further constrained. I believe this wiggling reduced the accuracy of my calibration.

