This is an old revision of the document!
Optitrack Motion Capture Tutorial
Author: <Dongbin Kim> Email: akdba0207@gmail.com
Date: Last modified on <06/07/16>
Keywords: <Motion capture, calibration, streaming data, Optitrack>
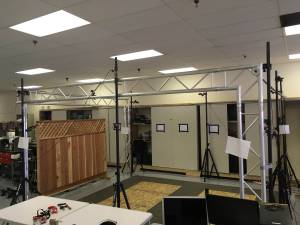
The photo above depicts Optitrack Motion Capture System which allows you to set up the virtual coordinates. The big picture problem is that GPS probably gives you the wrong flight data because you mostly do experiment inside the lab. Solving this partially or completely is important because it will help you do the mission with given virtual coordinates so you won't necessarily need GPS. This tutorial shows you how to run Optitrack Motion Capture System and takes approximately 15 hours to complete.
Motivation and Audience
This tutorial's motivation is to point-to-point navigation without GPS. Readers of this tutorial assumes the reader has the following background and interests: Computer Vision, UAV automation, Navigation with coding software(C, Matlab, ROS)
<fc blue>
* Know a little knowledge of C++, MatLab.
\\
* Perhaps also know how to check your own TCP/IP address.
\\
* Perhaps additional background needed may include building up a solid structure.
\\
* This tutorial may also attract readers who want to apply automotive motion on any Unmanned Vehicle.
</fc>
\\
The rest of this tutorial is presented as follows:
* [[tutorialTemplate#partsListAndSources Parts List and Sources]]
* Construction
* Programming <!- delete this line if not applicable →
* Final Words
==== Parts List and Sources ====
US-based vendors to obtain material to complete this tutorial include <list relevant hyperlinks or phone numbers and addresses>.
To complete this tutorial, you'll need the following items
^PART NAME/DESCRIPTION ^VENDOR ^ VENDOR Number or URL ^ PRICE($) ^ QTY ^
| Arena Motion Capture Software |Natural Point |www.naturalpoint.com | 1999 | 1 |
| Calibration Square |Natural Point |www.naturalpoint.com | 99 |1|
| Camera Stand : 10ft | Natural Point | www.naturalpoint.com | 79 |4|
| Hardware Key | Natural Point | www.naturalpoint.com | 99 |1|
| Manfrotto Super Clamp with 3-way Head(#056,#035,#037)| Natural Point | www.naturalpoint.com | 69 |4|
| Manfrotto Wall Mount with Swivel-Tilt Head| Natural Point | www.naturalpoint.com | 49 |15|
| Marker Set : 5/8“ Semi-soft| Natural Point | www.naturalpoint.com | 249 |2|
| Motion Capture Suit(M) | Natural Point | www.naturalpoint.com | 279 |1|
| Optihub | Natural Point | www.naturalpoint.com | 299 |3|
| Optitrack FLEX:V100R2 Red,46.2ºFOV(4.5mm) | Natural Point | www.naturalpoint.com | 599 |18|
| Optitrack Sync Cable : 30ft| Natural Point | www.naturalpoint.com | 10 |2|
| OptiWand Kit | Natural Point | www.naturalpoint.com | 249 |1|
| USB 2.0 Active Extension Cable : 5m | Natural Point | www.naturalpoint.com | 20 |3|
| USB Cable : 16ft A to B | Natural Point | www.naturalpoint.com | 5 |3|
| USB Cable High Grade, Left | Natural Point | www.naturalpoint.com | 10 |18|
Here is the list as a Google XLS document
Here is the list as a PDF file
==== Construction ====
This section gives step-by-step instructions along with photos to capture the motion in Optitrack. A schematic to construct Optitrack is shown here. mocap_tutorial_1_install.pdfmocap_tutorial_2_execution.pdf are the Acrobat file of the same schematic. You should read and follow PDF&Video from (https://www.naturalpoint.com/optitrack//products/arena/tutorials.html) to run ARENA Optitrack software). Following steps are that you can do after you fully understand the PDF and Videos. Let's get the mo-cap data! Make sure all the camera don't have to get any shake effect by being touched or hit because you would definitely have to do calibration again.
Step 1
Let's do calibration with cameras first. Vidio link is here : https://youtu.be/6Swvm3Ovhh0
Step 2
 Put at least 3~4 markers on the object that you are going to test for. I used ARDrone for this tutorial.
and Do record the motion. It's described on this video : https://youtu.be/gkofO6oSEH4
Put at least 3~4 markers on the object that you are going to test for. I used ARDrone for this tutorial.
and Do record the motion. It's described on this video : https://youtu.be/gkofO6oSEH4
Step 3

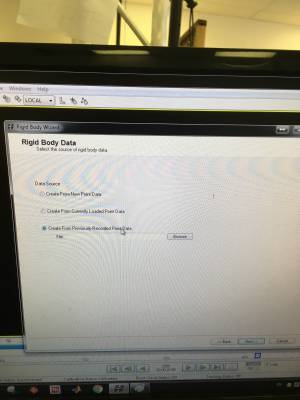 Setting up Rigid Body with the recorded data. This Video : https://youtu.be/J2HEsIdODV8, describes how to get the rigid body.
Step 4


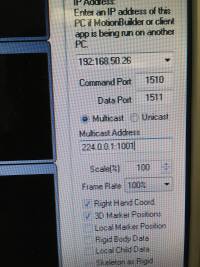 Prepare to Stream Data : Find your IP Address from Mo-Cap PC. and Multicast Address from NatNet SDK PDF file. Then, put those numbers on Stream Tap of Arena Software.
Step 5.1 - Stream Data with MatLab
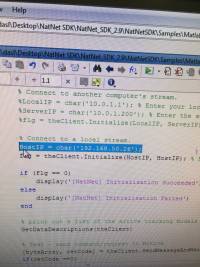
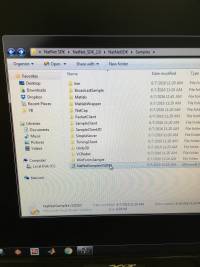
 Go to your NatNet_SDK_2.9 folder→NatNetSDK→Samples→Matlab, then open NatNetMatlabSample file via Matlab.
Then, Find “HostIP = Char()” part, put the PC IP address. Click Save and Run button.
This Video : https://youtu.be/hM92SEKKja4, describes the details.
Go to your NatNet_SDK_2.9 folder→NatNetSDK→Samples→Matlab, then open NatNetMatlabSample file via Matlab.
Then, Find “HostIP = Char()” part, put the PC IP address. Click Save and Run button.
This Video : https://youtu.be/hM92SEKKja4, describes the details.
Step 5.2 - Stream Data with Visual Studio(C++)
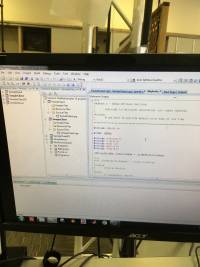
 Go to your NatNet_SDK_2.9 folder→NatNetSDK→Samples, then open NatNetSamplesVS2010. It's a solution file, you will get header,cpp files automatically as long as you don't move them to the another folder.
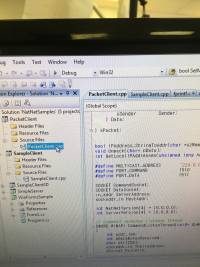
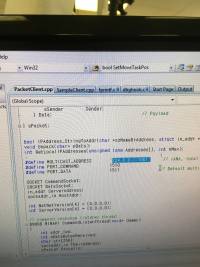
At PacketClient.cpp, Find MULTICAST_ADDRESS line, then put the correct Muticast address ip address.
Run the code.
This Video : https://youtu.be/J_UZ7nzjsiY, describes the details.
Go to your NatNet_SDK_2.9 folder→NatNetSDK→Samples, then open NatNetSamplesVS2010. It's a solution file, you will get header,cpp files automatically as long as you don't move them to the another folder.
At PacketClient.cpp, Find MULTICAST_ADDRESS line, then put the correct Muticast address ip address.
Run the code.
This Video : https://youtu.be/J_UZ7nzjsiY, describes the details.
==== Final Words ====
This tutorial's objective was to run Optitrack to get Motion capture data. Complete Steps for running the Optitrack Arena software perfectly. Once the concepts were conveyed the reader could set up virtual volume to do any experiment regarding point-to-point and automation movement with software coding.
Speculating future work derived from this tutorial. In the big picture, the problem of the motion error from GPS can be solved with this tutorial because you will get exact coordinate data from the software.
For questions, clarifications, etc, Email: Dongbin Kim, akdba0207@gmail.com


