Table of Contents
Introduction of the Sewing machine
Author: Jihyun Lee Email: ljh11110000@gmail.com
Date: Last modified on <05/26/17>
Keywords: Sewing, Sewing machine

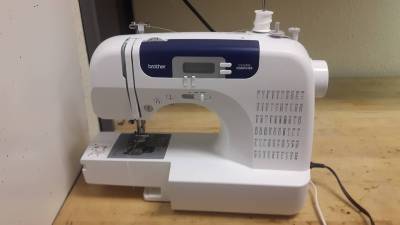
The photo above depicts sewing machine which allows you to do sewing. This tutorial shows you how to prepare to use a sewing machine and takes approximately 1 hour to complete.
Motivation and Audience
This tutorial's motivation is to teach students how to use and also how to make a cushion with a sewing machine. Readers of this tutorial assumes the reader has the following background and interests:
* Know how to use scissors and a ruler.
* Perhaps know how to draw.
The rest of this tutorial is presented as follows:
Parts List and Sources
To complete this tutorial, you'll need the following items
| PART NAME/DESCRIPTION | VENDOR | VENDOR Number or URL | PRICE(USD) | QTY |
|---|---|---|---|---|
| Brother sewing machine cs-6000i | Amazon.com | https://www.amazon.com/Brother-cs6000i-60-Stitch-Computerized-Sewing/dp/B000JQM1DE | 159 | 1 |
| Thread | walmart.com | https://www.walmart.com/ip/Designer-s-Choice-All-Purpose-Sewing-Thread-24-Pkg/52202193 | 9 | 1 |
| Cotton fabric | walmart.com | https://www.walmart.com/ip/2-Yards-Cut-Sheeting-Solids-In-Multiple-Colors/49332656?variantFieldId=actual_color | 6 | 2 |
| Pillow | walmart.com | https://www.walmart.com/ip/Mainstays-HUGE-Pillow-in-20-x28-in-Blue-and-White-Stripe/16686241 | 3 | 1 |
Here is the sewing_machine_user_manual.pdf pdf file if you need any additional information.
Starting sewing machine
This section gives step-by-step instructions along with photos to understand the basic things in order to use a sewing machine.
Preparing Materials
These are the things that you will need to use a sewing machine.
 1. Sewing machine.
 2. Accessory bag. (it includes foot, needles, driver, ext to replace when things are broken)
 4. Fabric. And additionally you can also prepare scissors, rulers, and pins if you need it.
Understanding the functions
This is the explanation of the functions and instructions of the sewing machine.

1. Power key - Turn on the power key
2. Concentric plug - Make sure it is connected
3. Plug of the foot controller - Make sure it is connected

1. Bobbin winder - winds the lower thread
2. Spool spin - holds the spool of thread
3. Thread guide - guides a thread's direction
4. Upper tension control dial - controls the tension of the upper thread
5. Thread take up lever - where upper thread pass by
6. Thread cutter - after stitching you can cut the thread by this cutter
7. Needle - the needle of the sewing machine
8. Hand wheel - moving the needle
9. Foot controller

1. Start/stop button - Start or stop sewing
2. Reverse/reinforcement stitch button - helps you do reverse stitching
3. Needle position button - raise or lower the needle
4. Sewing speed controller - change the speed of the sewing


1. Stitch selection keys - You can set the number that describes the type of the stitch(in the right side of the picture)
2.Stitch length adjustment key - by pressing - or + you can change the length of the stitch (for reference 2-1)
3.Stitch width adjustment key - by pressing - or + you can change the width of the stitch (for reference 3-1)

1. Presser foot lever - Raise or lower the presser foot lever to raise or lower the presser foot
2. Button hole lever - Lower buttonhole lever when sewing button holes and bar tacks
3. Needle clamp screw - use it to hold the needle in place
4. Needle
5. Presser foot - it applies pressure consistently on the
fabric as the sewing takes place. Attach the appropriate
presser foot for the selected stitching.
Threading
You will need to do threading before using the sewing machine.
Threading is setting the threads at the sewing machine in order to do stitching.
There are two parts(upper threading, lower threading) and after this you are ready to use a sewing machine.

Things to prepare : Tread and a bobbin.
(1) Winding the lower thread


1. Put the thread at the spool pin.
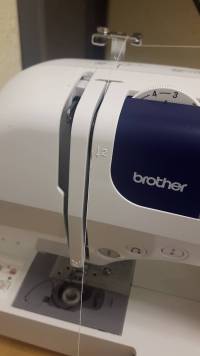
2. If you follow the order in the picture that is on the sewing machine it will look like the second picture.
3. Make sure bobbin winder shaft is moved to the right in order to wind the bobbin.
4. And then press the foot presser and it will automatically wind the bobbin and also automatically stop when it is done.

5. For the result you should have the bobbin look like this.
Please check that it is winded evenly or it will cause Error 6.

6. And raise the needle to the highest position by turning the hand wheel and open the cover that is underneath.
7. Lastly put the bobbin inside. The thread should be coming out from the left side to the right side. And then pull the thread to the direction that is shown by the arrow.
(2) Upper thread


1. You don't have to remove the thread from the spool pin because it is going to be used as a upper thread.
2. Follow the order of the picture.(There is also arrows and number on the sewing machine)
3. After that raise the needle to the highest position and then insert thread to the needle. It should go from your side to sewing machine side.
4. Pull out the thread approximately 10 cm to the back side of the sewing machine.
Before using the sewing machine
(1) Don't ignore errors.

This is the table of the errors that can occur.
If error occurs sewing machine will display on LCD.
(2) Always be careful when you're using sewing machine due to it can cause injury.

You can put the foot on the upper side when you are not using so then sewing machine will not work (Error 1 will occur). Also be careful with scissors and needle. I cut myself with the scissor.
(3) When the thread is tangled stop stitching and cut it.

If you don't sewing machine will not work or it will make the needle bent or broke. Also after stitching there will be 10 cm of additional thread and it is safe to remove it before it will be tangled with other thread.
(4) Since you make the needle bent or broke stop using it and replace with a new needle.

You can find additional needle and a driver in accessory bag.
Loosen a screw with the driver and the needle will come out. Replace it with a new needle and tighten the screw again.
How to make a cushion
In this section, you will be able to understand how to make a DASL cushion with 2 types of stitching.
Step 1 : Preparation

1. In order to make a cushion you will need cushion, fabric(cover, logo), scissor, color pencil.


2. Choose a logo and draw it on the fabric. Use the removable pen or pencil.
3. And then cut it with a scissor.
Step 2 : Stretch stitching

1. This is the correct posture of the human using the sewing machine.
Hold the fabric with a hand and place one foot on the pedal.


2. In order to do stretch stitching choose number 00. Also adjust the width and the length. Mine was 2.0.
3. Put the fabric under the pressure foot and step on the pedal to stitch. At first it is better to adjust the speed slowly since you are not use to stitching.
4. It will automatically go forward but you can move fabric faster or turn.


5. I am going to connect these two part And make a square shape with stretch stitching.
(I bought small fabric. Don't buy small fabric.)
Step 3 : APPLIQUÉ
When you want to stitch logo Applique is the most common way.

1. First, I will glue the logo to make sure it stays in a right place.
You can use pin if you want.

2. Set the number at 05, and length and width at 1.0, 5.0.


3. When you do Applique, you are going to follow the logo shape. When you finish following the line, pull the pressure foot up and then turn the fabric to the place you want.
And if you are going to move to another shape, make sure you put the needle up so that it wouldn't broke. Also cut the thread or it will tangle when you start stitching again.
4. If the logo is made in straight line you can just hold the fabric.
If you have to stitch the curve, you will have to turn the fabric. Make sure that you don't give too much force.
Also When you double stitch it, it will be like the second picture so try to stitch at once.

5. This is the picture when Applique is done.
Step 4 : Making a cover


1. When you make a cover, the fabric should be fliped over. Then when you flip it again it will look like the second picture.
I am going to use square fabric and the 2 parts of the half of the square fabric. The reason I cut another square in to 2 pieces is half of the square fabric will make a gap and you will be able to put the cushion inside.
If the half of the square fabric are placed overlap(3 cm), the gap won't show up.

2. Stitch all edge of the cover with stretch stitching. Since the cushion is not flat, it is difficult to measure accurately. I choose to make a bigger cover and then make the additional fabric flat, then measure and cut it away.
For reference, when you stitch you can use ruler to draw a line if you want stitch it straight.

3. Flip over the cover and cut the thread that you can see.


4. This is the picture when you finish.
Final Words
This tutorial's objective was to give basic knowledge to use the sewing machine. For questions, clarifications, etc, Email: ljh11110000@gmail.com

