This is an old revision of the document!
Table of Contents
How To Build a Granular Gripper
Author: <Yu Hang He> Email: hey6@unlv.nevada.edu
Date: Last modified on <07/25/2019>
Keywords: granular gripper, vacuum gripper

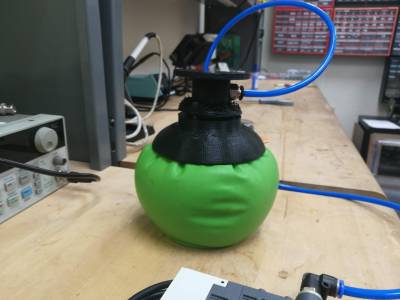
The photo above depicts the granular gripper which allows you to grip objects using jamming principle of granular material. The big picture problem is that conventional vacuum gripper cannot operate with irregular shaped objects. Solving this partially or completely is important because a robust gripper can allow robots to fully interact with its environment. This tutorial shows you how to construct the granular gripper and takes approximately 6 hours to complete.
Motivation and Audience
This tutorial's motivation is to demonstrate how to construct a granular gripper. Readers of this tutorial assumes the reader has the following background and interests:
* Know how to model with 3D design software and use 3D printer to manufacture the model
* Know how to work with Arduino and build a circuit on a prototype board
* Perhaps also know how to program with Arduino IDE
* Perhaps additional background needed may include understanding of pneumatic system
The rest of this tutorial is presented as follows:
- Final Words
Parts List and Sources
To complete this tutorial, you'll need the following items included in this BOM.
Here is the Gripper BOM
Construction
This section gives step-by-step instructions along with photos to <fill in the blank>. (If a circuit-building tutorial:) A schematic to construct <fill in the blank> is shown here <add image>. <Add hyperlink to PDF of schematic> is the Acrobat file of the same schematic.
Step 1
<Add photos to make step easier to understand>
Step 2
<Additional steps like Step 3, Step 4, etc>
Programming
A link to the source code can be found <provide URL to your code, probably saved in this DASL Wiki>.
The goal of the code is <brief explanation>. It works in the following way
<!- Insert a snippet of your code here. Try to keep to less than 0.5 page long –>
The snippet above serves to <fill in the blank>. It does this by <fill in the blank>.
<!- Insert another snippet of your code here. Try to keep to less than 0.5 page long –>
Next, the code does <fill in the blank>. It does this by <fill in the blank>.
Final Words
This tutorial's objective was to <fill in the blank>. Complete <choose: construction details, source code and program descriptions> for <fill in the blank>. Once the concepts were conveyed the reader could <fill in the blank>.
Speculating future work derived from this tutorial, includes <fill in the blank>. In the big picture, the problem of <fill in the blank> can be solved with this tutorial.
For questions, clarifications, etc, Email: paul.oh@unlv.edu
