Table of Contents
Robust R/C Tailless Fixed-Wing Airplane
Author: Dongbin Kim. Email: akdba0207@gmail.com
Date: Last modified on <03/20/16>
Keywords: <R/C airplne, fixed-wing, tailless, R/C, Robotic>
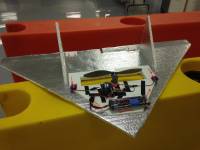
The photo above depicts Handmade R/C fixed wing airplane which allows you to fly outside to have fun or do some search. The big picture problem is balancing control of the airplane. Solving this partially or completely is important because the airplane would crash if it weren't balanced. This tutorial shows you how to build up fixed-wing aircraft by hand and takes approximately 3~4 hours to complete.
Motivation and Audience
This tutorial's motivation is to how to build up R/C airplane with our hands. Readers of this tutorial assumes the reader has the following background and interests:
* Know how to understand R/C airplane
* Perhaps also know how to use transmitter to control the R/C airplane
The rest of this tutorial is presented as follows:
- Parts List and Sources
- Construction
- Final Words
Parts List and Sources
US-based vendors to obtain material to complete this tutorial include <homedepot, Hobby store, Lowe's>.
To complete this tutorial, you'll need the following items
| PART NAME/DESCRIPTION | VENDOR | VENDOR Number or URL | PRICE | QTY |
|---|---|---|---|---|
| 4mm*30“*36” White corrugated plastic sheet | Lowe's | 1 | ||
| 1/2“*48*120 Foamed plastic insulation | Lowe's | 1 | ||
| 10*4.7 Propellers set : propeller&adapters | Hobby Store | 10 | ||
| Electronic Speed Controller(ESC) 20A-BEC | Hobby Store | 1 | ||
| 880KV, 2836/9 Motor | Hobby Store | 1 | ||
| Spektrum Radio receiver | Hobby Store | 1 | ||
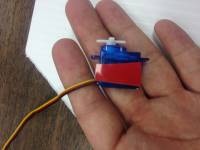
| Micro Servo motors 9g | Hobby Store | 2 | ||
| Spektrum Dx6i R/C Transmitter, 6 channels(should be more than 3 channels) | Hobby Store | 1 | ||
| Zipties | DASL | 30 | ||
| Scissor | DASL | 1 | ||
| Scotch Packaging Tape | DASL | 1 | ||
| Scotch Double-Sided Tape | DASL | 1 | ||
| Electrical Tape | DASL | 1 | ||
| Cutter | DASL | 1 |
Here is the Listed as a PDF file, you can see the BOM and also the manual
Construction
This section gives step-by-step instructions along with photos to build up R/C Airplane
Step 1. Make the deck
1. Draw out the deck on the corrugated plastic following this template with ruler and cutter. Please be careful while cutting. it's difficult to cut.
2. How you are going to draw
3. After you cut.
Step 2. Mount the servo motors
1. Clean the servo motors with alcohol or any solvent if they are greasy, then apply double-sided tape to them.
2. Attach the servos to the deck that you just cut, with their wires toward the front and their shafts toward the outside edges. if the wires are too short to reach to the center, you probably need to move the servos closer to the center.
3. To reinforce both the servos, Tie them with zip ties! Place the holes for the zip ties very close to the servo so the servo can't move.
Step 3. Mount the motor, propellers
1. Drill at least more than 2 holes on the bracket to mount the motor.
2. Attach the motor to the bracket. Please make sure the screws are tight.
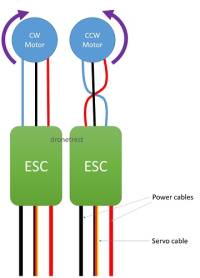
3. Ready to attach propeller to the motor, first attach the propeller adapter to the propeller, then connect them to the motor. Make sure place the direction of the blade to the correct to make wind forward. The picture on the right is to help you understand what I mean. Remember the direction of the propeller for the connection with ESC later. (Ref.-http://copter.ardupilot.com/wiki/connect-escs-and-motors/)
4. Attach them on center of upper side of propeller hole, use Zip ties to make it secure. Be sure the propeller has enough space to spin
Step 4. ESC connection with the motor, battery
1. With the motor
- Connect the motor to ESC with the direction you remember from propeller connection as the followings above. The direction of the motor rotation must be matched to the one of the propeller.
(Ref1-http://www.dronetrest.com/t/esc-to-motor-wiring/356/3)
2. With the battery
- Connect the batter to the power line of ESC.
Step 5. Radio receiver connection with ESC, Servos
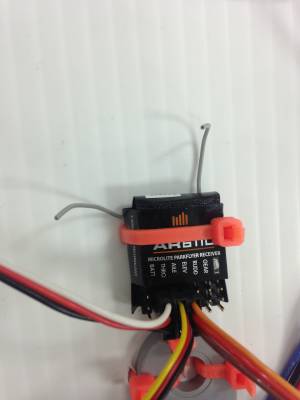
1. Place the receiver as close to the motor as you can.
2. Place ESC to THRO, one servo to AILE and another servo to ELEV.
3. Make sure you plug in the right direction. Signal, Positive, Negative from left to right.
Step 6. Binding ESC with the transmitter
-Here's youtube link as reference. if you are using different transmitter, type 'Name of the transmitter + Receiver' on Youtube. You can easily find a video for binding.
https://www.youtube.com/watch?v=DyMtlj2eaks
Step 7. Make the airframe, Attach the deck
1. Follow the template to cut the airframe out of the foamed plastic insulation.
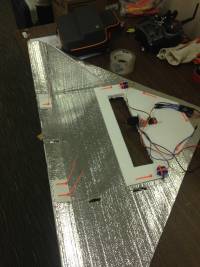
2. Cut the propeller hole, then attach the deck on the airframe. Afterwards, tape the edge side of the airframe not to be broken easily.
2. Cut the elevon free by making a single beveled cut of around 30 deg as shown above. It's not that necessary to be 30 deg though. just keep it constant for the length of the elevon. Make sure you use scotch packaging tape to secure the elevons
3. Make a 1/2“ slot in the elevon mid-span, to creat 2 elevons that move independently.
Step 8. Mount the rods
1. Drill out the servo arm to the diameter of a coat hanger(or iron wire you prepared). If you don't have the right shape, cut different arms to make the similar.
2. Turn on the transmitter, make the right stick center. That means, you are going to control the servo to the initial mode. So you can make precise adjustment for elevons.
3. Attach both servo arms as close to 90 deg as possible and add their retaining screws.
4. Straight the coat hanger(or iron wire), then bend it to creat a U-shaped hook, then adapt it in the servo arms
5. Cut two 1 and 1/2”*2 and 1/2 from corrugated plastic sheet.
6. Use the pliers to make a 90 deg bend in each rod, just after of the hinge, bending toward the center of the frame.
7. Force the end of the rods through the inside of the corrugated plastic sheet you just cut, to create two control horns. Lay the airframe flat and attach each horn to its elevon with two Zip ties.
Step 9. Make the stablizers
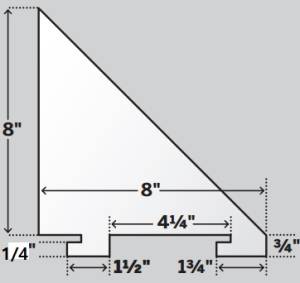
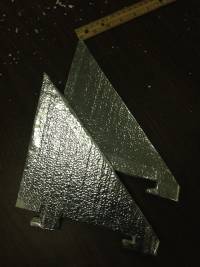
1. Cut out the 2 stabilizers following the template out of the foamed plastic insulation.
2. Use scotch packaging tape to cover the edge to be secure.
3. Line up the stabilizers right next to the rods about 3/4“ forward of the hinge. Carefully cut the frame for the stabilizer legs.
4. Attach the stabilizers on the frame.
Step 10. Mount the battery
1. Stick the hook side of the velcro tape as close to the Center of Gravity as possible. Apply the loop side of the velcro tape to the battery pack. Make sure the battery is charged, then attach it to the deck.
Final Words
This tutorial's objective was to build up handmade R/C fixed-wing airplane. Complete flight simulation for flying the R/C airplne in real. Once the concepts were conveyed the reader could understand the problem you may encounter when you do research on UAV flights.
For questions, clarifications, etc, Email: akdba0207@gmail.com


