
Table of Contents
Making the Darwin-OP Walk
Author: James Maliniemi Email: [email protected]
Date: Last modified on 6/28/16
Keywords: tutorial, Darwin-OP, Action Editor, step-by-step
This tutorial shows readers how to use the Walking Tuner program to make the Darwin-OP walk stably according to predefined parameters, and takes approximately 1 hour to complete.
Motivation and Audience
This tutorial's motivation is to help readers understand the basics of making the Darwin-OP walk using the pre-installed Walking Tuner program by presenting the steps necessary to make the Darwin-OP walk according to predefined parameters. This tutorial assumes the reader has the following background:
* Knowledge of how to use computers with the Linux OS and familiarity with the command-line interface.
The rest of this tutorial is presented as follows:
- Materials and Sources
- Procedure
- Final Words
Materials and Sources
This tutorial assumes the reader already has access to a Darwin-OP robot. The reader will also need either a computer capable of accessing the Darwin-OP's desktop remotely or a keyboard, monitor, and mouse to access the Darwin-OP's desktop directly. Other important sources are listed below.
| Page Name | Link |
|---|---|
| Walking Tuner | http://support.robotis.com/en/product/darwin-op/development/tools/walking_tuner.htm |
| Darwin-OP Dimensions | http://support.robotis.com/en/product/darwin-op/references/reference/hardware_specifications/mechanics/dimensions.htm |
| Darwin-OP Kinematics | http://support.robotis.com/en/product/darwin-op/references/reference/hardware_specifications/mechanics/kinematics.htm |
| Linux Tutorial for Beginners | http://linuxcommand.org/ |
Procedure
This section gives step-by-step instructions along with photos to make the Darwin-OP walk according to predefined parameters, using the Walking Tuner program.
Step 1
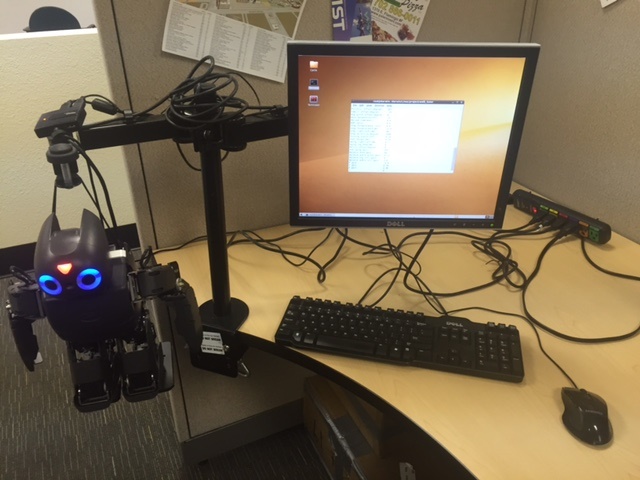
Figure 1: Darwin-OP in safe inactive position
First, start the Darwin-OP. Ensure that the Darwin-OP is hangin by its support loop while the Walking Tuner is in use, as shown in Figure 1 above, to eliminate risk of damage while the Darwin-OP moves.
Step 2

Figure 2: The Command Line Interface
Next, access the terminal via the Darwin-OP’s desktop interface or remotely using a remote-access program. Once open, the window should look like Figure 2 above.
Step 3
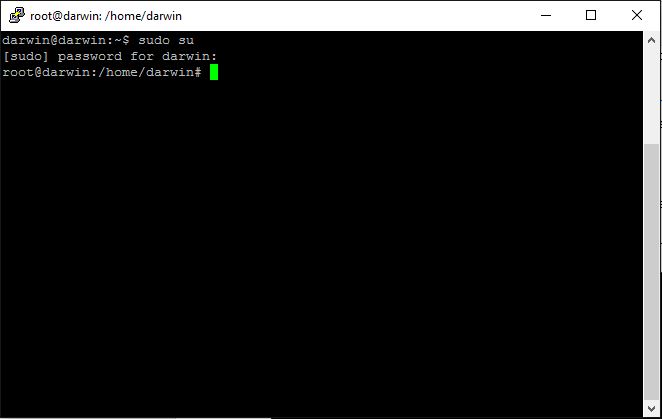
Figure 3: sudo su entry and access to root directory
Next, use the sudo su command to get administrator permissions and access the root directory as shown in Figure 3. The standard password for the Darwin-OP is 111111. If this password does not work, then somebody has made changes to the system. If successful, the text at the left of the cursor should have changed “darwin@darwin” to “root@darwin”.
Step 4

Figure 4: Navigation to Walk Tuner
Next, enter the commands as shown in Figure 4 above. This will bring you to the directory where the Walking Tuner program is located.
Step 5

Figure 5: Walk Tuner interface with default settings
Next, enter the command “./walk_tuner” to start the Walking Tuner program. If successful, you should see an opening screen. Beyond that you should see the Walking Tuner program interface. The Walk Tuner interface is not optimized for the standard window size and leaving the window in its standard dimensions will hide/mismatch displayed information. So stretch the command line window vertically and enter the “re” command. Repeat until the window is sized properly, shown above in Figure 5. If readers are not familiar with the Walking Tuner interface and its’ parts, refer back to the Walking Tuner page from the Robotis e-manual.
Step 6
Now that the Walking Tuner is open and running, the Darwin-OP can be programmed to walk according to the user’s wishes. There are many correct ways to make the Darwin-OP walk using the Walk Tuner, so emphasis is always first placed on design philosophy. No part of this tutorial requires or teaches knowledge of dynamic motion synthesis, so the Darwin-OP will move slowly to approximate a static structure at each step of its gait. Because it will move slow, the Darwin-OP must move stably. It will accomplish this is a twofold manner. First, it will be low to the ground. Second, the Darwin-OP’s hips will sway with each step such that the center of gravity will nearly always be directly over one of the Darwin-OP’s feet. For the purposes of this tutorial, the Darwin-OP will be programmed to walk with the following parameters:
- The total period of the gait will be two seconds, or 2000 milliseconds. This is an arbitrarily slow gait speed for the Darwin-OP.
- Each step will be 52mm ahead of the previous step, one half length of the Darwin-OP’s foot.
- The Darwin-OP’s hips will sway 47.5 mm to the left and right from center. This is the sway distance necessary to place the center of the Darwin-OP’s center of mass over the center of each foot while walking.
- It will walk such that the hip actuators (11 and 12) are 148 mm off the ground. This low height is meant to provide stability and more freedom of motion to each leg. The number was defined as the maximum height the Darwin-OP could maintain while centered over one foot and placing the other foot in front of it according to the previously established parameters.
The next steps involve entering the parameters and observing the results, making changes wherever necessary.
Step 7
When using the Walk Tuner program, it is necessary to almost always keep the Darwin-OP walking and suspended while changing settings incrementally. This is necessary because it is possible to use the Walk Tuner to make the Darwin-OP use a walking pattern that can damage the Darwin-OP. When walking settings are changed incrementally, chances of damaging the Darwin-OP are minimized. So start by moving the cursor to the Walking Mode entry and change it to ON. Remember when using the Walking Tuner that changing settings always requires moving the cursor to the correct entry and changing settings using the “[“ and “]” keys. Always observe the Darwin-OP when making changes in the Walk Tuner.
Step 8
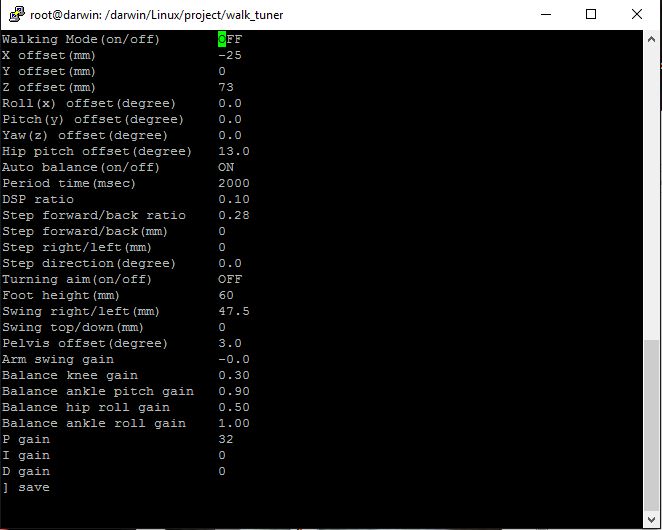
Figure 8: Walk Tuner interface with changes
Start by setting the x-offset to -25 millimeters. The center of mass of the Darwin-OP is not directly over the center of the hips when standing still with the torso upright. The center of mass is actually further back, so it is generally a good idea to set the x-offset to a negative number to compensate, depending on the gait.
Set the y-offset to 0, as there is no reason why the feet should not be centered underneath the hips (when looking from the front of back of the Darwin-OP, on the y axis), so the feet should remain the standard distance apart.
Set the z-offset to 73 millimeters, because the z-offset is measured from a standing position as datum and 73 millimeters is the offset necessary to place the hips 143 millimeters above the ground. Remember to use the Dimensions and Kinematics pages in the Darwin-OP e-manual as reference when referencing dimensions.
Set the Period Time to 2000 milliseconds, to satisfy the requirement, outlined in step 6, that the gait period of the Darwin-OP be slow to minimize the effects of dynamic motion.
Set the Step Forward/Back setting to 26 millimeters. The value should be entered as 26 rather than 52 (half the length of the Darwin-OP’s foot) because the figure is a measure of distance from datum (x-offset) for both feet, where one is ahead and the other is behind. Therefore, a 26 millimeter Step Forward/Back setting is one half the maximum difference in position of both feet in the forward direction. Remember also that this figure resets to zero whenever the Walking Mode is turned off.
Next, set foot height to 60 millimeters. This is more desirable than the default 20 millimeters because 60 millimeters offers better clearance at such a low z-offset and during the hip swings. As for the hip sway, set Swing Right/Left to 47.5 millimeters, as described by the parameters in step 6. We want the hips to remain at 143 millimeters above the ground, so set Swing Top/Down to 0.
Set Arm Swing Gain to 0. This gait is meant to be slow and stable so it won’t benefit from arm swing.
Step 9
Next, to test the walk, set Walking Mode to OFF and set the Step Forward/Back to 26 millimeters again. Take the Darwin-OP from its hanging position and set it on a stable flat surface. With one hand loosely gripping the Darwin-OP by the support loop, set the Walking Mode to ON. Observe the motion. If at any point the Darwin falls over or presents any other obvious instability, pick it up by the support loop immediately to prevent damage and adjust the parameters accordingly. However, if the parameters have been entered correctly, there should be no problems. The gait of the Darwin-OP should resemble the video below.
When finished, use the “exit” command to leave the Walking Tuner, then turn off the Darwin-OP normally.
Final Words
This tutorial's objective was to use the Walk Tuner Program to make the Darwin-OP walk according to predefined parameters. Once the concepts were conveyed the reader should be able to use the Walk Tuner to make the Darwin-OP walk according to the reader's desires.
Speculating future work derived from this tutorial includes research into making the Darwin-OP perform more complex and autonomous tasks. In the big picture, the problem of how to make the Darwin-OP walk in a specified fashion can be solved with this tutorial.