This is an old revision of the document!
HEBI Arm Hello World
Author: Leonardo Georgescu
Email: [email protected]
Date: Last Edited 10/08/2020
Keywords: Hebi Arm
Hebi arm is a 6 DoF arm that has a gripper and is able to pick and place objects. The benefit of the arm is that it has series elastic actuators. It also has force-torque sensors which I will be discussing how they work later.
<fs large>Hardware Connection
1. Connect the Dexter arm to the router using an ethernet cable. Then connect your computer to the router.Connecting Dexter directly to your computer will not work. There will be additional steps needed.

<fs large>Connecting to Hebi using their GUI
1. Hebi is powered by a 36V power supply.
2. Connect the ethernet cable to your computer.
3. Ensure that you are connected to the ethernet by going in your network configurations. This would be different depending on what iOS you are using.
4. Download the software Hebi Scope for your operating system from this website: https://docs.hebi.us/downloads_changelogs.html#downloads
5. Once you are in the Scope software, click on Settings in the bottom left. The robot may not show up yet which is alright. Under Network Interface click the revolving arrow as shown in the image bellow.

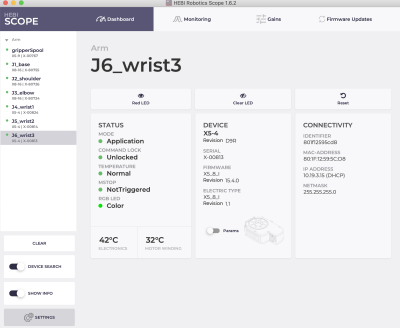
6. You should see the following on the Scope which indicates that you are connected to the robot. Using this GUI you can see the IP Address, each individual motor, and other useful information.

<fs large>Here are the instructions on operating it using the Python SDK
1. Download PyCharm from here: https://www.jetbrains.com/pycharm/download/#section=mac
2. Create an environment and since you will be connected to the hardware make sure not to select virtual environment. Under project interpreter, click “Existing Interpreter” and create the project.
3. Make sure you have pip installed in Pycharm
4. If you are using a linux machine type “pip install –user hebi-py” and if you're not using a linux machine like me then use “pip install hebi-py.”
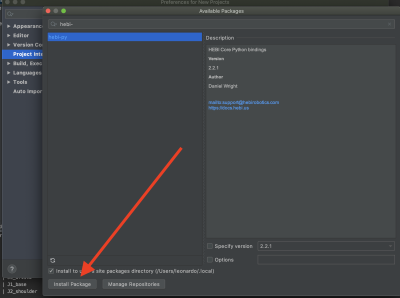
5. In Pycharm, make sure to download the hebi-py library. Click “Preferences for Project.” Under “Project Interpreter” click the plus sign on the bottom and search for “hebi-py” and then “Install Packages.”

6. Now we should write a Python script to check if we can read the motors. The python code below was taken from the Hebi website and also provided below:
import hebi
from time import sleep
lookup = hebi.Lookup()

sleep(2) #2 seconds to discover what is needed
print('The following modules are found:')

for entry in lookup.entrylist:
    print(f'{entry.family} | {entry.name}')
