Table of Contents
Hardware Setup for the HTC Vive
Date: Last modified: 04/04/17

The photo above depicts a finished setup of the HTC Vive in the lab. This tutorial will walk readers through what hardware is needed and how to setup a capture space properly.
The rest of this tutorial is presented as follows:
Parts List and Sources
US-based vendors to obtain materials to complete this tutorial include:
–Amazon
–Vive US
–Fry's Note: As of 04/04/17 they have a location near the lab in Las Vegas making quick runs to it convenient. Thus, why they are mentioned here.
To complete this tutorial the reader will need the following items:
| Part Name/Description | Vendor | Vendor URL | Qty | Notes |
|---|---|---|---|---|
| HTC Vive Kit | Vive or Fry's | https://www.vive.com/us/product/ or http://www.frys.com/product/8987273 | 1 | The kit will come with all the necessary hardware. 1 Vive HMD (head mounted display), 2 lighthouse base stations, 2 controllers, and the cables and power sources needed. |
| A computer with at least a GTX 1060 or equivalent | Amazon | https://www.amazon.com/ | 1 | Please reference the recommended computer specs for any computer the reader plans to use. The lab however already has a computer specifically for research with the vive. |
| Tripod mounts for lighthouse base stations | Amazon or build in-house | https://www.amazon.com/s/ref=nb_sb_noss_2?url=search-alias%3Daps&field-keywords=tripod+for+camera | 2 | Since the base stations have a standard camera mounting hole on the bottom any standard camera tripod should work. You can also use scrap pieces of 2×4 wood to create your own mount for them. |
Specifics on Items already in the lab
In the lab, we already have all the items needed. This section will go into specifics on the items already available to students.
HTC Vive Kit
The kit includes all of the hardware needed to set up the vive with a computer. The contents of the kit are as follows:
Computer

The picture above depicts the computer that we have in the lab for research with the HTC Vive. As of 04/04/17 it has a GTX 1080, a 6th gen i7 and 16gb of RAM. This is more than enough to power the Vive. There is an HDMI and USB 3.0 port close to the power button on the case for easy access for the connection to the lightbox.

Construction
This section gives step-by-step instruction along with photos to set up a space for use with the HTC Vive.
Step 1
 Decide where to setup the HTC Vive. Although the recommended distance between the base stations is 5 meters there have been setups with much larger distances between them (reference reddit). Make sure that there is enough headroom for the recommended 2-meter height for the base stations, although this height isn't set in stone and can be even placed on the ground while using the sync cable (reference reddit). When deciding on where to place the setup keep in mind that any reflective surfaces(especially the flooring) within or near the base stations can cause noise.
Step 2
 Once a place has been decided upon. Choose how and where within the space to set up the base station lighthouses. The base stations need to be placed on two opposite corners of the specified space. It is up to the reader to decide whether to buy new tripod mounts or to make their own. I chose to make my own and have had no problems with them. Although if I make a ver.2 of them I will make sure they are level and don't wobble around easily, and make the footprint smaller.
Step 3
 If a computer isn't already setup in the space, set it up just outside of the tracking space with the monitor facing towards the tracking space so that you will be able to see the monitor while inside the space. Take this to also charge the controllers with the included AC adapters.

Step 4
 If you haven't set the base stations on top of their mounts for your space do so now. Before powering them on tilt the base stations so that they are both facing the center of the space and can “see” each other (each base station has about a 120-degree field of view). Find their power sources and connect them to an outlet. After being powered on you will see a blue light and a letter (A,b, or c) show up on the face of the base station. After 2-3 minutes the light should turn green.
Step 5


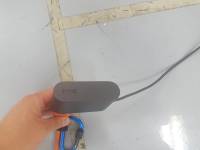
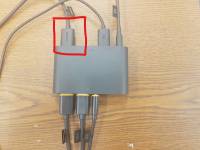
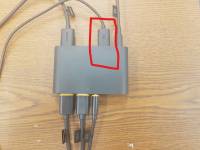
Next connect the HMD to the lightbox by connecting the HDMI, USB, and power to their appropriate ports on the front of the box. This is indicated by the HTC logo and with a “vr” label on the top of the box indicating the appropriate side. Then plug the HDMI and USB 3.0 cables to the computer and lightbox. If your computer only has a display port there is a mini-DP port on the light box. Finally, connect the lightbox power source (12V-15A). You have now finished setting up all the hardware.
Step 6
 If you are using the lab computer you can skip this step. If you are using a new computer you will need to now install SteamVR. First install Steam, once installed and updated go to the Library then tools. Find SteamVR and install it by clicking it.


Step 7


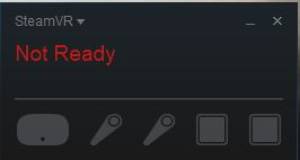
Now that you have SteamVR, launch it by clicking the vr button that is in the right top corner. Once launched wait for the HMD, controller, and base stations to connect and appear green inside the SteamVR window. If you are having issues connecting with the HMD, try unplugging the power and USB from the lightbox, wait 2-3 minutes, then retry by plugging the power back in and the USB into a different port. You may need to repeat this multiple times.
Step 8
 Once you have connected the HMD, controllers and base stations click the steamvr tab within the steamvr window on the left top corner and select “Run Room Setup”. Follow the instructions to finish the room setup. If this is the first time setting up the HTC Vive on the computer you will have to go through the HTC Vive tutorial right after you finish the room setup. You will need some headphone or earphone to complete the HTC Vive tutorial so have them ready to plug into the Vive's audio port.
Final Words
Congratulations! You have now finished setting up the HTC Vive and are ready to move onto the next tutorial! Some parting advice, if you run into problems with connectivity with the HMD after the first setup, try restarting the computer. This has solved 100% of any problems I have run into. If you lose communication between your base stations too often you may have positioned them incorrectly and can't see each other.
The next tutorial will go over what the OpenVR SDK is and the basics of how to use it.


