Table of Contents
Controlling Dynamixel Motor RX-28 over RS485 Protocol With a LEGO MINDSTORMS NXT
The goal of this tutorial will help the people learn the follows:
- Introduction about Dynamixel motor.
- How to control a Dynamixel motor over RS485 Protocol.
- Using LEGO MINDSTORMS NXT to control a Dynamixel motor RX-28.
Dynamixel motor
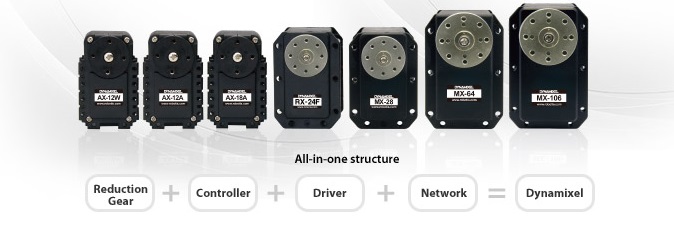
The Dynamixel is smart actuator system and designed to be modular and daisy chained on any robot or mechanical design. The DYNAMIXEL is a fully integrated DC (Direct Current) Motor + Reduction Gearhead + Controller + Driver + Network, all in one servo module actuator. Programmable and networkable, actuator status can be read and monitored through a data packet stream.
Dynamixel RC-28 and How to control it over RS485 Protocol
Dynamixel RC-28
The Dynamixel RX-28 is one of several Dynamixel engines offered by ROBOTIS company. For more information, please click on the link to see specification like dimension, stall torque, control table …etc

RX-28 datasheet http://support.robotis.com/en/product/actuator/dynamixel/rx_series/rx-28.htm
How to control Dynamixel RX Series
To control RX Series with a personally made Main Controller, the signal of Main Controller UART should be converted into RS485 type signal. The following is a recommended circuit diagram.
 The power of Dynamixel is supplied via Pin1(-), Pin2(+). (The above circuit is built into the Dynamixel-only controller.)In the above circuit diagram, the direction of the data signal of TxD and RxD in the TTL Level is determined according to the level of DIRECTION 485 as follows:
- Unordered List Item Ordered List ItemIn case of DIRECTION485 Level = High: The signal of TxD is output to D+ and D-.
- Unordered List ItemIn case of DIRECTION485 Level = Low: The signal of D+ and D- is output to RxD.
The pin assignment of a connector is as shown below. The RX-series Dynamixel has two 4pin connectors on it and those two connectors have the same function. So, you may use any of the two when connecting the actuators.

Overview of Communication
To control Dynamixel, communication should be established according to the protocol of Dynamixel. Dynamixel is driven by receiving binary data.
Packet
Main Controller and Dynamixel communicate with each other by sending and receiving data called Packet. The packet has two kinds: Instruction Packet, which Main Controller sends to control Dynamixel, and Status Packet, which Dynamixel responses to Main Controller.
Role of ID
ID is a specific number for the distinction of each Dynamixel when several Dynamixels are linked to one bus. By giving IDs to Instruction and Status Packets, Main Controller can control only the Dynamixel that you want to control
Protocol
Dynamixel does the Asynchronous Serial Communication with 8 bit, 1 Stop bit, and None Parity. If Dynamixel with the same ID is connected, the packet will collide and network problem will occur. Thus, set ID as such that there is no Dynamixel with the same ID. The ID of Dynamixel is changeable. For this change, please refer to ‘Changing IDs of Dynamixel’. The factory default setting ID is 1.
Half Duplex
Half duplex UART is a serial communication protocol where both TxD and RxD cannot be used at the same time. This method is generally used when many devices need to be connected to a single bus. Since more than one device are connected to the same bus, all the other devices need to be in input mode while one device is transmitting. The Main Controller that controllers the Dynamixel actuators sets the communication direction to input mode, and only when it is transmitting an Instruction Packet, it changes the direction to output mode.

Byte to Byte Time
The delay time between bytes when sending an instruction packet. If the delay time is over 100ms, then the Dynamixel actuator recognizes this as a communication problem and waits for the next header (0xff 0xff) of a packet again.

Instruction Packet
Instruction Packet is command data that Main Controller sends to Dynamixel.
The structure of Instruction Packet is as follows:
 The meaning of each byte composing packet is as follows:
- 0xff 0xff This signal notifies the beginning of the packet.
- ID It is the ID of Dynamixel which will receive Instruction Packet. It can use 254 IDs from 0 to 253 (0X00~0XFD).If Broadcast ID (ID = 254 (0XFE)) is used, all linked Dynamixels execute the command of Instruction Packet, and Status Packet is not returned.
- LENGTH It is the length of the packet. The length is calculated as “the number of Parameters (N) + 2”.
- INSTRUCTION This command gives an instruction to Dynamixel and has the following types.

- PARAMETER 0…N Parameter is used when Instruction requires ancillary data.
- CHECK SUM It is used to check if the packet is damaged during communication. CheckSum is calculated according to the following formula.
Check Sum = ~ ( ID + Length + Instruction + Parameter1 + … Parameter N ) Where “~” is the Not Bit operator. When the calculation result of the parenthesis in the above formula is larger than 255 (0xFF), use only lower bytes.
For example, when you want to use Instruction Packet like the below
ID=1 (0x01), Length= 5 (0x05), Instruction= 3 (0x03),
Parameter1= 12 (0x0C), Parameter2= 100 (0x64), Parameter3= 170 (0xAA)
Check Sum = ~ ( ID + Length + Instruction + Parameter1 + … Parameter 3 )
= ~ [ 0x01 + 0x05 + 0x03 + 0x0C + 0x64 + 0xAA ]
= ~ [ 0x123 ]
= 0xDC
Thus, Instruction Packet should be 0x01, 0x05, 0x03, 0x0C, 0x64, 0xAA, 0xDC.
Controlling RX-28
RX-28 was used in this tutorial have ID is 91(0x5b).
Let see example:
We have instruction packet like that: 0xFF 0xFF 0x5B 0x05 0x03 0x20 0xE8 0x03 0x91
- 0xFF 0xFF This signal notifies the beginning of the packet.
- 0x5B It is ID of RX-28.
- 0x05 It is the length of the packet.
- 0x03 This code to allow writes data to RX-28.(See in instruction table)

- 0x20 It is the address of Moving Speed. Open the RX-28 datasheet, and look at the Control Table.

- 0xE8 0x03 This is data speed, 0xE8 is Low Byte, 0x03 is High Byte. It means 0x03e8(1000).
- 0x91 check sum.
So, after received this packet, RS-28 will turn with speed 1000.
Using LEGO MINDSTORMS NXT to control a Dynamixel motor RX-28
Hardware components
- LEGO NXT

- Cable,NXT

- USB cable

- NXT Breadboard adapter and bus connection.

- Dynamixel RX-28 and bus connection

- Power Supply adapter to the Dynamixel Bus

- Adaptor 12V 5A

Connections
 For controlling single Dynamixel
 For controlling 2 Dynamixel
Video
Code
Controling RX-28
- Dynamoixel.c
void wheel(unsigned char ID, bool Rotation,unsigned int Speed)
{
    byte Speed_H,Speed_L;
    Speed_L = Speed;
    if (Rotation == 0){                          // Move Left
        Speed_H = Speed >> 8;

    }else if (Rotation == 1){                    // Move Right
        Speed_H = (Speed >> 8)+4;
    }
    Dynamixel_data[0]=HEADER; // start
    Dynamixel_data[1]=HEADER;
    Dynamixel_data[2] = ID;
    Dynamixel_data[3] = WHEEL_LENGTH;
    Dynamixel_data[4] = COMMAND_WRITE_DATA;
    Dynamixel_data[5] = RAM_GOAL_SPEED_L;
    Dynamixel_data[6] = Speed_L;
    Dynamixel_data[7] = Speed_H;
    Dynamixel_data[8]= ~(Dynamixel_data[2]+Dynamixel_data[3]+Dynamixel_data[4]+Dynamixel_data[5]+Dynamixel_data[6]+Dynamixel_data[7]);//  Check Sum
    string msg;
    msg = ByteArrayToStr(Dynamixel_data);// convert to string
    SendRS485String(msg);//send
    WaitForMessageToBeSent();
}
Controlling 1 Dynamixel
- Dynamoixel.c
#include "Dynamixel.h"
#define ID 91
bool mode=0;
task main()
{
  //-------------------------------------------------------------------------------------
  UseRS485(); // (1) Port S4 configured for RS485
  RS485Enable(); // (2) turn on RS485
  RS485Uart(HS_BAUD_57600, HS_MODE_DEFAULT); // (3) initialize UART 57600  HS_MODE_8_DATA
  Wait(100);
  //-------------------------------------------------------------------------------------
  TextOut (0, LCD_LINE1, "Wheel Mode");
  setMode(ID, WHEEL, 0, 0);
  //setMode(91, SERVO, 1, 1023);
  Wait(500);
  //setMode(91, SERVO, 0x001, 0xFFF);
  while(true)
  {
    if(ButtonPressed(BTNCENTER, FALSE)){               // If the center button is pushed, the program switches from
         wheel(ID,1,0);  ClearScreen();                // wheel mode to servo mode and vice versa.
         while(ButtonPressed(BTNCENTER, FALSE));
         if(mode==0)
         {
               setMode(91, SERVO, 1, 1023);// set servo mode
               Wait(500);
               mode=1;
         }
         else
         {
               setMode(ID, WHEEL, 0, 0);// set wheel mode
               Wait(500);
               mode=0;
         }

     }
     //-----------------------------------------------------------------------
     if(mode== 1) // for servo mode
     {
         TextOut (0, LCD_LINE1, "Servo Mode");
         if(ButtonPressed(BTNRIGHT, FALSE)){        // if Right Button is pressed
           while(ButtonPressed(BTNRIGHT, FALSE)); // Wait for Button is released
           servo(ID,50,300);// turn to 50 with speed 300
           Wait(1000);
           ClearScreen();
           TextOut (0, LCD_LINE3, "Move to 50");
          }else
         if(ButtonPressed(BTNLEFT, FALSE)){
           while(ButtonPressed(BTNLEFT, FALSE));
           servo(ID,1000,1000);  //turn to 1000 with speed 1000
           Wait(1000);
           ClearScreen();
           TextOut (0, LCD_LINE3, "Move to 1000");
          }
    }
    else // for wheel mode
    {
         TextOut (0, LCD_LINE1, "Wheel Mode");
        if(ButtonPressed(BTNRIGHT, FALSE)){        // if Right Button is pressed
           wheel(ID,RIGHT,800);  // turn right with speed 800
           ClearScreen();
           TextOut (0, LCD_LINE3, "RIGHT");
          }else
         if(ButtonPressed(BTNLEFT, FALSE)){
           wheel(ID,LEFT,500);  //turn left with speed 500
           ClearScreen();
           TextOut (0, LCD_LINE3, "LEFT");
         }
         else
         {
           wheel(ID,LEFT,0); //stop
           ClearScreen();
           TextOut (0, LCD_LINE3, "STOP");
         }
    }
   }
  RS485Disable();
}
Controlling multiple Dynamixels
Each Dynamixel will have its own ID. If you want to control multiple Dynamixel, then you have to send the correct ID of Dynamixel you want to control.
In this example, I have 2 Dynamixel with ID = 90 and ID = 40.
#define ID 91
#define ID1 40
I will set mode activity for both of them by this code.
setMode(ID, WHEEL, 0, 0); set for Dynamixel ID run on wheel mode.
Wait(10);
setMode(ID1, WHEEL, 0, 0); set for Dynamixel ID1 run on wheel mode.
Now, send data to control each Dynamixel:
wheel(ID,RIGHT,1000); Dynamixel ID run with speed 1000
wheel(ID1,RIGHT,300); Dynamixel ID1 run with speed 300
After this 2 line, Dynamixel with ID=91 will run with speed 1000 and Dynamixel with ID=40 will run with speed 300.
- MultipleDynamoixel.c
#include "Dynamixel.h"
#define ID 91
#define ID1 40
bool mode=0;
task main()
{
  //-------------------------------------------------------------------------------------
  UseRS485(); // (1) Port S4 configured for RS485
  RS485Enable(); // (2) turn on RS485
  RS485Uart(HS_BAUD_57600, HS_MODE_DEFAULT); // (3) initialize UART 57600  HS_MODE_8_DATA
  Wait(100);
  //-------------------------------------------------------------------------------------
  TextOut (0, LCD_LINE1, "Wheel Mode");
  setMode(ID, WHEEL, 0, 0);Wait(10);
  setMode(ID1, WHEEL, 0, 0);
  //setMode(91, SERVO, 1, 1023);
  Wait(500);
  //setMode(91, SERVO, 0x001, 0xFFF);
  while(true)
  {
    if(ButtonPressed(BTNCENTER, FALSE)){               //If the center button is pushed, the program switches from wheel mode to servo mode and vice versa.
         wheel(ID,1,0);  ClearScreen();
         while(ButtonPressed(BTNCENTER, FALSE));
         mode++;
         if(mode==3) mode=0;
     }
     //-----------------------------------------------------------------------
     if(mode== 0) // for servo mode
     {
         TextOut (0, LCD_LINE1, "Wheel Mode 0");
        if(ButtonPressed(BTNRIGHT, FALSE)){        // if Right Button is pressed
           wheel(ID,RIGHT,800);  // turn right with speed 800
           ClearScreen();
           TextOut (0, LCD_LINE3, "RIGHT");
          }else
         if(ButtonPressed(BTNLEFT, FALSE)){
           wheel(ID,LEFT,500);  //turn left with speed 500
           ClearScreen();
           TextOut (0, LCD_LINE3, "LEFT");
         }
         else
         {
           wheel(ID,LEFT,0); //stop
           ClearScreen();
           TextOut (0, LCD_LINE3, "STOP");
         }
    }
    else if(mode== 1) // for servo mode
     {
         TextOut (0, LCD_LINE1, "Wheel Mode 1");
        if(ButtonPressed(BTNRIGHT, FALSE)){        // if Right Button is pressed
           wheel(ID1,RIGHT,800);  // turn right with speed 800
           ClearScreen();
           TextOut (0, LCD_LINE3, "RIGHT");
          }else
         if(ButtonPressed(BTNLEFT, FALSE)){
           wheel(ID1,LEFT,500);  //turn left with speed 500
           ClearScreen();
           TextOut (0, LCD_LINE3, "LEFT");
         }
         else
         {
           wheel(ID1,LEFT,0); //stop
           ClearScreen();
           TextOut (0, LCD_LINE3, "STOP");
         }
    }
    else // for wheel mode
    {
        TextOut (0, LCD_LINE1, "Wheel Mode 2");
        if(ButtonPressed(BTNRIGHT, FALSE)){        // if Right Button is pressed
           wheel(ID,RIGHT,1000);  // turn right with speed 800
           wheel(ID1,RIGHT,300);
           ClearScreen();
           TextOut (0, LCD_LINE3, "RIGHT");
          }else
         if(ButtonPressed(BTNLEFT, FALSE)){
           wheel(ID,LEFT,300);  //turn left with speed 500
           wheel(ID1,LEFT,1000);  //turn left with speed 500
           ClearScreen();
           TextOut (0, LCD_LINE3, "LEFT");
         }
         else
         {
           wheel(ID,LEFT,0); //stop
           wheel(ID1,LEFT,0); //stop
           ClearScreen();
           TextOut (0, LCD_LINE3, "STOP");
         }
    }
   }
  RS485Disable();
}
If you have any questions, please contact me via email: [email protected]