This is an old revision of the document!
Table of Contents
Pegasus Cam Setup Tutorial
Author: Dylan Wallace Email: wallad3@unlv.nevada.edu
Date: Last modified on 03/08/19
Keywords: Pegasus Cam, Raspberry Pi, Networking

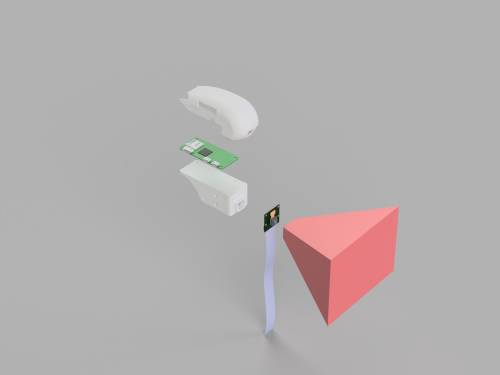
The photo above depicts the part view of the Pegasus Cam which allows the user to achieve low-latency networked computer vision. The big picture problem is to reduce the cost of computer vision and robotic platforms for research and education. Solving this partially or completely is important because it will further the research into computer vision and robotics and will allow for broader reach of STEM education to K-12 students. This tutorial demonstrates how to setup the Pegasus Cam in its entirety, and how to use it in computer vision applications. This tutorial takes approximately 2 hours to complete.
Motivation and Audience
This tutorial's motivation is to create a low-latency platform for networked computer vision. This tutorial assumes the reader has the following background and interests:
* Know how to use the basics of the Linux command line interface (CLI)
* Perhaps also know how to use a 3D printer and 3D slicer
* Perhaps additional background needed may include OpenCV experience
The rest of this tutorial is presented as follows:
- Final Words
Overview
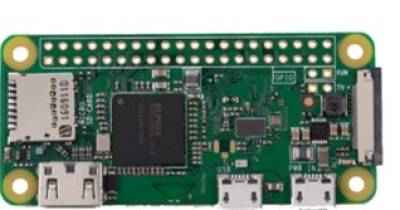
The Pegasus Cam utilizes a Raspberry Pi Zero W and Raspberry Pi Camera as the main hardware for its implementation. The Raspberry Pi Zero W was chosen for its integrated networking with built-in WiFi and low price. The Raspberry Pi Camera provides high quality video at 30 fps and has plug-n-play functionality with the Raspberry Pi Zero W. The specifications and pictures for the Raspberry Pi Zero W and the Raspberry Pi Camera can be seen below:
- 1GHz, single-core CPU
- 512MB RAM
- 802.11 b/g/n wireless LAN
- Bluetooth 4.1
Raspberry Pi Camera ($30)
- 8 MP image sensor
- 3280 x 2464 images
- 1080p 30 FPS video
Background information and example project with the Raspberry Pi Zero W and Raspberry Pi Camera can be seen on many sites such as Element14, Adafruit, and Raspberry Pi Foundation.
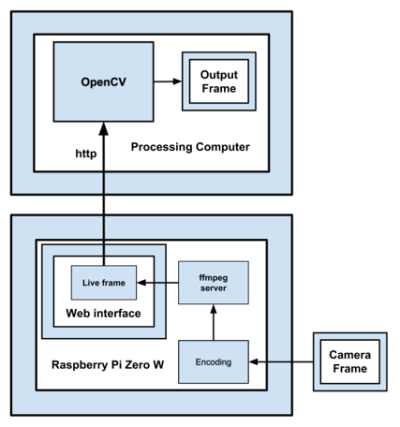
The Pegasus Cam operates on an ffmpeg streaming architecture originally developed by Silvan Melchoir, with optimizations to latency and OpenCV integration made for this version. The ffmpeg library is a highly powerful multi-media library for handling images and video streams locally and over networks. This framework allows the Pegasus Cam to seamlessly stream video over a network, and does so with low latency. The Pegasus Cam framework includes improvements to encoding, buffering, and stream management. Once the stream has been received by the web interface, it can then be integrated into OpenCV as a live camera source, allowing any OpenCV algorithm to be run just as in the case of a local camera. The full framework for the Pegasus Cam can be seen below:
Materials
To complete the construction of the Pegasus Cam, you will need some materials before beginning. All of these materials can be obtained from the Pegasus Cam Kit, or they can be sourced independently at many online retailers. These materials include:
- 4 - M3 Hex Bolts
- 4 - M5 Hex Bolts
- 1 - Raspberry Pi Zero W
- 1 - Raspberry Pi Camera v2
- 1 - 10-in Raspberry Pi Camera Ribbon Cable
- 1 - >8 GB Micro-SD Card
- 1 - Raspberry Pi PSU OR micro-USB-to-USB-A Cable w/ > 2.0 A power source
- 1 - Wireless Router w/ Internet Access
- 1 - 3D Printed Pegasus Cam Shroud
- 1 - 3D Printed Pegasus Cam Base
- 6 - ROBOTIS-Mini Plastic Pins (OPTIONAL)
Raspberry Pi Setup
The first step in setting up the Pegasus Cam is to prepare the Raspberry Pi Zero W with the correct operating system and with the correct network configuration files.
OS Install
The OS that we will be using on the RPi Zero W is the latest version of Raspbian Stretch Lite, which gives a minimal install of Raspbian onto the RPi. The download for the latest version of Raspbian Stretch Lite can be found here.
Once you have downloaded this zip file, extract it to the directory of your choice.
Windows
If you are using Windows, use the tool Win32 Disk Imager to image the OS onto your SD card as seen in this tutorial.
Unix
If you are using a Unix system, enter the following commands from your home directory on the command line:
1. Find the correct drive for your SD card:
sudo fdisk -l

This should return a list of drives and their drive address in the form /dev/sd__, where the __ denotes the drive letter and number (e.g. /dev/sdc1). Find the correct drive by identifying the size that matches your SD card, and note this drive address.
2. Unmount the SD card:
umount /dev/sd__
3. Copy the image to the SD card:
sudo dd bs=1M if=/home/<user>/<image file directory>/<Raspbian Stretch version>-raspbian-stretch-lite.img of=/dev/sd__

This will image the OS onto the SD card, and may take some time.
Network Configuration
Now that the OS is on the SD Card, we need to edit some of the files to give the proper network configuration for our “headless” camera (i.e. no monitor, keyboard, or mouse used). These files will be placed onto the SD card after the OS image. You are free to use either Windows or Unix to edit these files, but make sure to use admin privileges when editing the files to ensure the changes are saved.
WPA Supplicant
First, we will edit the WPA Supplicant file. This file can be found as /etc/wpa_supplicant/wpa_supplicant.conf in the root directory of the SD card. This file has the following format:
network={
    ssid="ROUTER SSID"
    psk="ROUTER PASSWORD"
    key_mgmt=WPA-PSK
}
For this file, change the fields labeled “ssid” and “psk” to have the router login info for your router. Also make sure that your router uses WPA-PSK authentication for this file to work properly.
Interfaces
Next, we will change the information in the interfaces file. This file can be found in /etc/network/interfaces in the root directory of the SD card. This file has the following format:
source-directory /etc/network/interfaces.d

auto wlan0
allow-hotplug wlan0
iface wlan0 inet static
    address <PEGASUS CAM IP>
    netmask 255.255.255.0
    gateway <ROUTER IP>
    wpa-conf /etc/wpa_supplicant/wpa_supplicant.conf
As can be seen from this file, we want to assign a static IP address for the Pegasus Cam. To do this, change the field labeled address by replacing <PEGASUS CAM IP> with the desired IP address of your Pegasus Cam (note that this address should be on the same gateway as the router, i.e. router = 192.168.0.1, Pegasus Cam = 192.168.0.50). Also, change the field labeled “gateway” by replacing <ROUTER IP> with the IP address or gateway address of your router. If you do not know this address, you can find it by making sure you are connected to your router over WiFi and entering the following command in the terminal:
ifconfig (UNIX)
or
ipconfig (WINDOWS)
This will give you the IP address of your computer, as well as the gateway address of the router. The default for most routers is 192.168.0.1 .
SSH File
Lastly, we need to create a file named “.ssh” in the root directory of the SD card. This will allow us to use the Pegasus Cam as a “headless” camera, where we can use SSH to access the RPi and change setting, reboot, check status, etc.
Testing
Now that these files have been changed, we need to test the network connection to make sure the changes were applied properly. To do this, we will use SSH to remotely login into our Pegasus Cam. First, make sure to plug in the SD card (gently) in the SD card slot on the Raspberry Pi Zero W board, plug in the RPi camera using the ribbon cable (make sure that the cable is facing in the correct direction for both connectors), and then plug in the power connector into the RPi. Give the RPi about 2-3 minutes to boot up.
Windows
If you are on Windows, it is preferred to use Putty to ssh. Instructions for using Putty for SSH can be found in this tutorial. The username for this will be “pi”, the address will be the IP address we chose in the previous step, the password will be “raspberry” and the port will be 20 (SSH port). Make sure that the SSH connection is good before proceeding to the next step.
Unix
If you are on a Unix system, we will SSH using the command line. Type the following command into your command line to SSH into the RPi:
ssh pi@<PEGASUS CAM IP ADDRESS>
This will prompt you to enter the password, which will be “raspberry”. Make sure that the SSH connection is good before proceeding to the next step.
If the SSH is unsuccessful, it may be required to plug in a monitor & keyboard to perform the raspi-config step. Then, the network options and SSH settings can be configured using this menu.
RPi Config
Finally, we need to configure the RPi for our use. To do this, enter the following command into the SSh terminal once the Pegasus Cam has been fully connected:
sudo raspi-config
This will bring up a screen that allows you to have a host of options. First, we will change the hostname of the camera, which can be accessed through the “Network Options” menu. We want to set the hostname to something obvious, so “Pegasus-Cam-#” is a good name to use to identify multiple Pegasus Cams on your network. Next, we want to turn on the RPi Camera. This can be accessed through the “Interfacing Options” menu. Once the camera is turned on, we just need to assign a new password to the camera. this can be done using the first menu option, “Change User Password.” Change this password to something unique enough to protect your Pegasus Cam from intruders, but easy enough to remember so that you can access the Pegasus Cam for any debugging reasons.
Finally, once the config is done, we just need to run two command on the SSH command line:
sudo update
sudo dist-upgrade
Once these steps have been completed, your Pegasus Cam will be ready for the software install.
Software Setup
Now that the Raspberry Pi Zero W is setup with the correct software and network configuration, we can install the Pegasus Cam software. We will do this using the SSH terminal form the previous steps. Enter the following commands into your SSH terminal:
git clone https://github.com/D-Wazzle/Pegasus-Cam.git
cd Pegasus-Cam
./install.sh
This will install the software. During the setup, choose Apache as the server type, and use port 3000. Keep the rest of the setting the same.
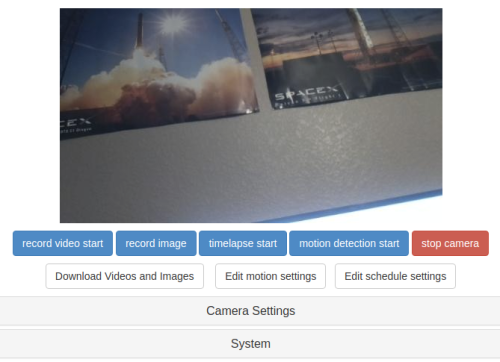
Once this is done installing, the web interface will auto-start (and will continue to start up automatically when the RPi is booted), and we can test it to make sure everything is alright. To test this we will type the following address into our web browser:
http://<PEGASUS CAM IP ADDRESS>:3000/html/
This should give us a view that is similar to the image below.
3D Printing
If you are using the Pegasus Cam Kit, you can skip this step
To create the case for the Pegasus Cam, we will use a 3D Printer. If you do not have access to a 3D Printer, sites such as 3D Hubs will allow for you to get the part printed for a price. You can also get the part 3D printed through the Pegasus Cam Kit version.
The STL files for the Pegasus Cam can be found on the Pegasus Cam Thingiverse page.
Assembly
Once the Raspberry Pi Zero W has been setup with all of the software and the case for the Pegasus Cam has been 3D printed, the last step is to assemble the case. To start, we will unplug the power from the Raspberry Pi Zero W. Next, unplug the camera ribbon cable from the RPi Zero and thread the cable from under the base (rectangular part) through the slit. Then, re-plug the cable into the RPi, making sure to plug the cable in the correct direction.
Now, use the 4 M3 screws to screw the RPi Zero onto the flat surface of the base. Do not tighten the screws too tightly as this could damage the RPi's PCB. If you are attaching your Pegasus Cam to the head of a ROBOTIS-Mini, use 6 of the ROBOTIS-Mini plastic pins to attach the base to the head Dynamixel of the ROBOTIS-Mini. Finally, to protect the Pegasus Cam hardware, use 4 M5 screws to attach the shroud (curved part) to the base. This part may be a tight fit over the base, so take caution when sliding the shroud over the base.
This will complete the assembly of the Pegasus Cam, and it is now ready to use in any Computer Vision application you can imagine.
OpenCV Usage
Using the Pegasus Cam as a video source in OpenCV is quite simple.
Python
In Python, integrating the Pegasus Cam is as simple as 1 line:
cap = cv2.VideoCapture("http://<PEGASUS CAM IP ADDRESS>:3000/html/cam_pic_new.php?time=9999999999999&pDelay=40000")
This line defines the Pegasus Cam stream as an http stream. The address specifically grabs the most recent frame at 30 fps.
Cplusplus
In Cplusplus, integrating the Pegasus Cam isjust as simple as in Python:
VideoCapture stream("http://<PEGASUS CAM IP ADDRESS>:3000/html/cam_pic_new.php?time=9999999999999&pDelay=40000");
This line serves the same purpose as the implementation in Python, opening the http stream's most recent frame at 30 fps.
Final Words
This tutorial's objective was to show how to setup the Pegasus Cam, allowing for low-latency networked computer vision. Complete assembly details, software setup, and source code for the Pegasus Cam is provided. Once the concepts were conveyed the reader should be able to create their own Pegasus Cam from a kit or with open-source files.
Speculating future work derived from this tutorial, includes creating an abstract ROS wrapper to allow for open-source integration of the Pegasus Cam with numerous robotics platforms. In the big picture, the problem of low-latency networked computer vision can be solved with this tutorial.
For questions, clarifications, etc, Email: wallad3@unlv.nevada.edu


