This is an old revision of the document!
ARToolkit
Author: Dylan Wallace Email: wallad3@unlv.nevada.edu
Date: Last modified on 08/02/16
Keywords: ARToolkit, Computer Vision, Software, SDK, Path Planning

The photo above depicts <fill in the blank> which allows you to <fill in the blank>. The big picture problem is tracking movement for computer vision and navigation applications. Solving this partially or completely is important because it allows for objects to be quickly located, and used in programs for various applications. This tutorial shows you how to install, setup, and use the ARToolkit, and takes approximately 3 hours to complete.
Motivation and Audience
This tutorial's motivation is to provide an introduction to the ARToolkit and its applications. Readers of this tutorial assumes the reader has the following background and interests:
* Know how to use basic Linux and Windows commands
* Perhaps also know how to program in C/C\\
* Perhaps additional background needed may include experience with other applications such as OpenCV.
\\
* This tutorial may also attract readers who are interested in path planning, computer vision, NXT applications, or augmented reality.
</fc>
\\ \\
**//Note://** The ARToolkit has difficulty recognizing many cameras on Linux. I recommend using Windows 8.1 or higher for these tutorials. Any high-resolution camera should give you good results from this tutorial, but [[https://www.amazon.com/Logitech-Internet-Camera-2-0-Megapixel-Resolution/dp/B000RZQZM0 Redistributables required to run the ARToolkit SDK. I recommend downloading them here before trying to run any ARToolkit examples.
===== Using the ARToolkit =====
==== Step 1: Printing markers/fiducials ====
The most important part of running any examples or other programs for ARToolkit is making sure your markers or fiducials are printed properly. For the simple examples from ARToolkit, we will use the Hiro pattern, found in C:\Program Files (x86)\ARToolKit5\doc\patterns. Optionally, here is a download of the file needed to print the marker. When printing this marker, make sure that your printer is printing at the highest settings, with contrast as high as possible for the image recognition.
==== Step 2: Running the Example ====
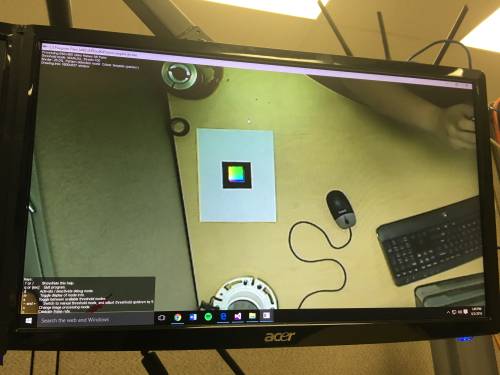
Once you have printed your marker, you are now able to run the most basic example that ARToolkit provides for testing the SDK. Go into your ARToolkit5 folder, and run the simpleLite program located in the bin folder. Accept the default values that popup for the video configuration, and the program will begin to run. Make sure that your camera has a clear view of your area, and that the marker is not obstructed by other objects. If your ARToolkit SDK is working properly, then your output should look something like this:
 When you move the marker along your surface, or even into the air, the colored cube should follow the marker. If not, then you may need to calibrate your camera parameters.
==== Optional: Step 3: Calibrate Camera ====
If the marker is not recognized by the ARToolkit simpleLite program, or if the marker tracking is not smooth, you may want to calibrate your camera parameters. Before calibrating your camera, you will need to print out the calibration chessboard. This should be located with the other ARToolkit patterns (in the doc folder of the ARToolkit5 directory), but i have also linked it here for download. Glue this page to a flat surface such a foam-board or cardboard so that the squares do not move around during calibration.
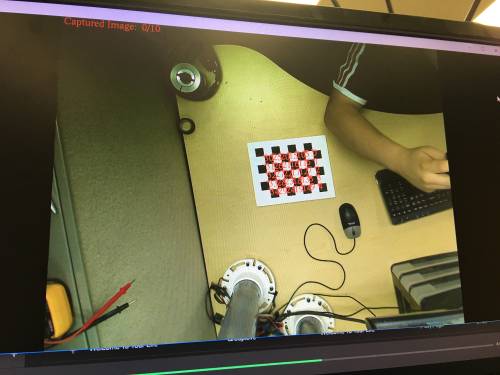
Open the bin folder inside the ARToolkit5 directory, and run the calib_camera.exe file as administrator. Select the defaults for the camera configuration before the program runs. Once your video is streaming, use the chessboard pattern glued onto a flat surface, to calibrate the camera. The video will look for all the corners on the chessboard, and these will turn red when it is ready to use these for calibration. The output should look something like this when the chessboard is in full view:
 Press space bar to capture the frame once all the corners have turned red. Keep your camera in a fixed position, and move the board with the pattern around your area. Try multiple angles and locations of the board, in order to get a variety of test data. Once you have captured 10 frames, the program will ask you to save the camera_para.dat file. Just press enter and the file will be saved into the bin folder. The last thing that you need to do is to replace this camera_para.dat file with the camera_para.dat file located in the Data folder of the bin directory.
Now run the simpleLite program again to see if these new parameters will help with tracking issues. If you are still having issues with tracking or recognizing markers, refer to the next step for debugging these issues.
==== Optional: Step 4: Debugging Marker Recognition ====
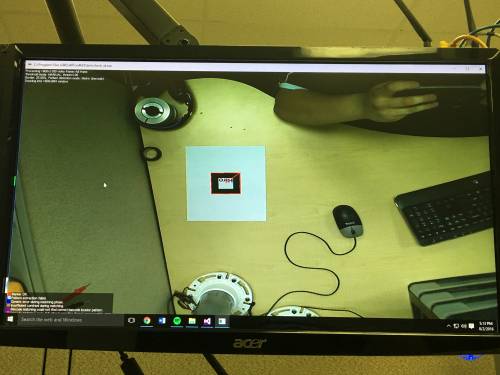
If even after calibrating your camera, you are still having marker recognition or tracking problems, then you may need to run the check_id.exe program provided in the ARToolkit5 directory, bin folder. This program will run through the different steps of the ARToolkit marker recognition process, and will help you figure out where your program is failing. You can use any of the square markers for this, but i recommend using the Hiro marker because it has the best contrast. When you start this program, your output should look something like this:
 The marker will be outlined in a different color depending on the results of each step of the recognition process. Below I will explain the different cases you can have, and what to do to fix them.
Red Outline: This is the ideal scenario. This means that the program is able to detect the marker and full track its movement.
Light Blue Outline: This means that the pattern extraction has failed. This can be caused by uneven lines in printing, or scaling issues with the pattern onto the paper. Try fixing this by playing with the settings on your printer, or changing the layout/scaling of the marker on the page.
Blue Outline: This is a generic matching error. Often when this comes up, it can be similar problems to the light blue outline. When this code comes up, try printing a new marker, or recalibrating your camera.
Brown Outline: This is the most common error to get with the pattern recognition. This means that the contrast between the black and the white in the marker is not high enough, and therefore the marker is not properly processed. This can be fixed by adjusting printer settings, print quality settings on your computer, or by replacing ink/toner cartridges.
Purple/Pink Outline: These two outlines have to do specifically with the barcode recognition in the ARToolkit SDK. This can happen when barcodes are not printed properly, are skewed/scaled improperly on the page, or when something is obstructing the full barcode. Try clearing you image area, and try reprinting your barcodes to fix these errors. Also, make sure the barcode you are using is of an acceptable format for the ARToolkit SDK.
===== Final Words =====
This tutorial's objective was to <fill in the blank>. Complete <choose: construction details, source code and program descriptions> for <fill in the blank>. Once the concepts were conveyed the reader could <fill in the blank>.
Speculating future work derived from this tutorial, includes <fill in the blank>. In the big picture, the problem of <fill in the blank> can be solved with this tutorial.
For questions, clarifications, etc, Email: wallad3@unlv.nevada.edu
