This is an old revision of the document!
Table of Contents
LabVIEW and LEGO MINDSTORMS NXT
Author: Yu Hang He Email: hey6@unlv.nevada.edu
Date: Last modified on 8/1/17
Keywords: LabVIEW, LEGO MINDSTORMS, NXT, NXT Motor

The photo above depicts NI LabVIEW Module for LEGO® MINDSTORMS® which allows you to use LabVIEW to program and control LEGO MINDSTORMS NXT and EV3. Combining LabVIEW, an industrial level engineering software, and LEGO MINDSTORM is useful for introducing students to important engineering concepts. This tutorial shows you how to download LabVIEW LEGO MINDSTORMS Module and use it to program NXT Motor and takes approximately 4 hours to complete.
Motivation and Audience
This tutorial's motivation is to demonstrate how to use LabVIEW module for LEGO MINDSTORMS to program and control NXT motor. This tutorial assumes the reader has the following background and interests:
* Know how to program with LabVIEW. (LabVIEW Basic Tutorial)
* Perhaps also know how to operate LEGO MINDSTORMS NXT
* This tutorial may also attract readers who want to use LEGO MINDSTORMS for instruction purpose
The rest of this tutorial is presented as follows:
Installation Guide
If you have not download LabVIEW yet, follow this tutorial to install LabVIEW. LabVIEW module for LEGO MINDSTORMS is currently only compatible with LabVIEW 2016 and previous editions.
If you already downloaded LabVIEW, follow this link http://sine.ni.com/nips/cds/view/p/lang/en/nid/212785 to download LEGO MINDSTORMS module. Click on Download link, then choose the version that is compatible with your LabVIEW. Follow installer's instruction to download and install LabVIEW module for LEGO MINDSTORMS.
NXT Module Basics
Section 1.1: Robot Project Center
The Robot Project Center is a central hub for your robot project. To create a robot project, click on File in the upper left corner of LabVIEW Getting Started window→ New NXT/EV3 → Robot Project.

Select Robot Project template and Blank Robot, then click on Create. Type in a name for your project and a new Robot Project Center will appear.
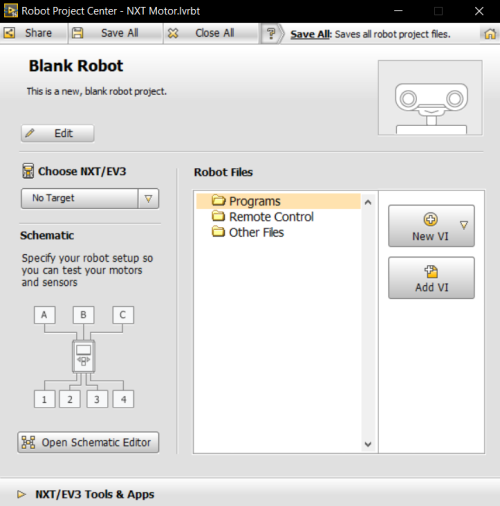
Edit—Displays the Edit Robot Profile dialog box, from which you can edit the robot name, description, and picture.
Choose NXT/EV3—Select an NXT brick. Allows you to associate an NXT brick with the current robot project.
No Target—Allows you to work in the Robot Project Center without connecting to an NXT brick.Find NXT/EV3—Displays the Find NXT dialog box, which lists the NXT bricks that the computer detects.
Programs—Display the VIs that belong to current robot project. You can create New VI or add an existing VI to the project.
Remote Control—Display the remote control configurations and VIs that belong to current robot project. You can create New remote control configurations.
Open Schematic Editor—Opens the Schematic Editor, which allows you to test motors and sensors connected to NXT.
Section 1.2: Connect NXT and NXT motor
Use a USB cable to connect your NXT brick to your computer. Turn on your NXT brick. Under Choose NXT/EV3, select Find NXT/EV3 to display the Find NXT/EV3 dialog box.
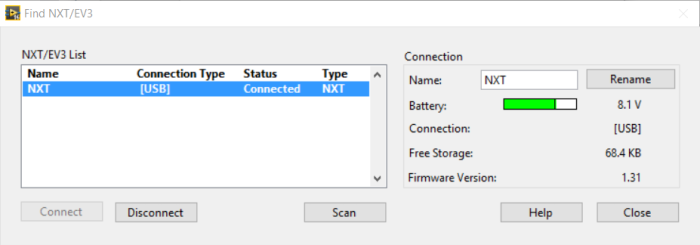
Select your NXT brick and click on Connect. You may need to update the firmware on your NXT brick. Follow the instructions to update the firmware.
Connect your NXT motor to your NXT brick port A using connector cable. To check that your NXT motor is successfully connected, click on Open Schematic Editor. Click on the yellow arrow next to Motor Port A and select NXT Motor.
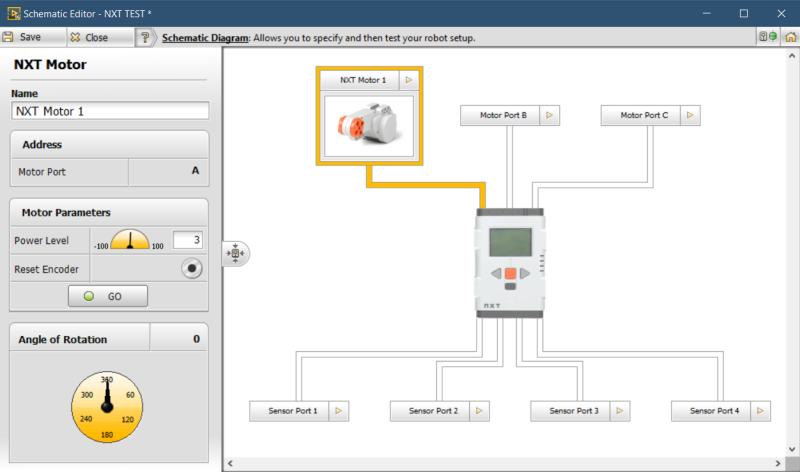
You can test your motor by change the power level and then press Go button. Power level determines the speed and direction that NXT motor will turn. When unloaded, NXT motor's power level is proportional to its rotational speed, around 160 RPM at 100% power. NXT motor also has built-in encoder that has 360 counts per single revolution of motor.
Section 1.3: Hello World
This example will show you how to display Hello World! message on the NXT brick screen.
On the Robot Project Center, click on Programs → New VI → VI for NXT/EV3 Target and name this VI “Hello World”.
A blank front panel and a blank block diagram should appear. If only front panel appeared, click on Window on top of front panel toolbar, → Show Block Diagram.
LabVIEW Module for LEGO MINDSTORMS adds completely separated sets of control and function palettes to LabVIEW. The original sets of palettes from LabVIEW will not operate with NXT brick. You must use palettes from MINDSTORMS Robotics section.
Right click on front panel and navigate to MINDSTORMS Robotics section. You must use these palettes to operate with NXT brick.
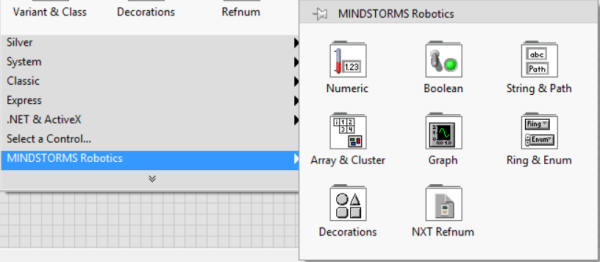
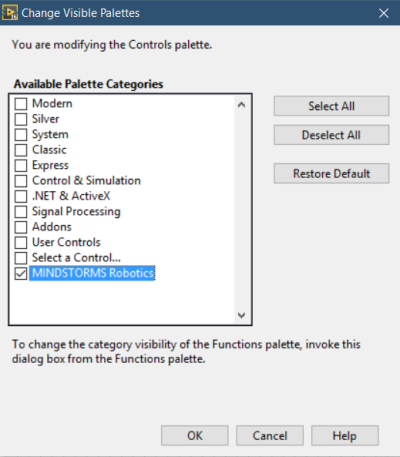
To simplify this process, right click on front panel. Click the downward arrow at bottom of control palette, then select Change Visible Palettes. Deselect all options, then choose MINDSTORMS Robotics as the only visible pallete.
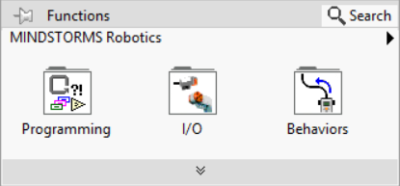
Block diagram has its own sets of function palettes in MINDSTORMS Robotics section and you must use them to work with NXT brick. Follow the same steps to access these palettes.
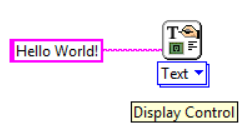
On the block diagram, right click to access function palettes. Open I/O palettes → Display to create a display control.
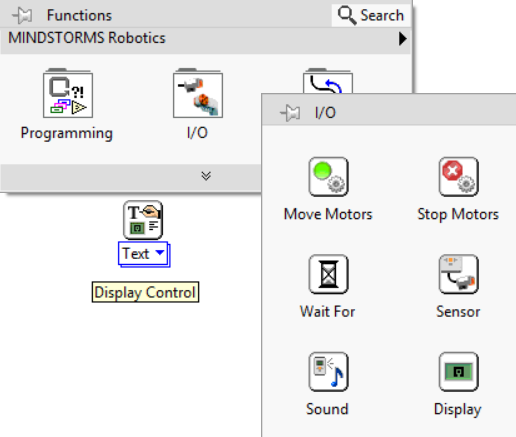
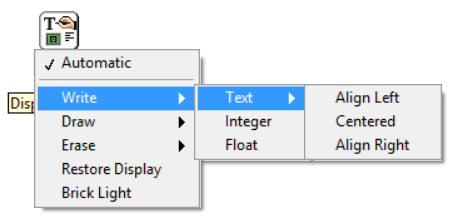
The VIs in the NXT I/O palette are called polymorphic VIs, meaning the VI has different instance you can choose from with the polymorphic VI selector. For example, click on the text box on the bottom of display control to view the different instances of display control you can create. You only need text for this example.
Right click the bottom left connector of display control, select Create → Constant. Type Hello World! as the constant.
Section 1.4: Executing Programs
There are two different modes you can use to run your program: Direct mode and Remote mode. In Direct mode, you run the program from the computer and communicate with the NXT brick with either USB or Bluetooth. In Remote mode, you download the program to the NXT brick with USB or Bluetooth and the program runs directly on the NXT brick without any communication from the computer.
To check which mode you will be running the program, check the label on the bottom left corner of the NXT brick. If the label read Main Application Instance, you are currently in Direct mode.
 If the label is an orange box with the name of your NXT brick, you are in Remote mode.
 To change between modes, right click on the label then choose the appropriate mode.
To run a program, turn on your NXT brick and connect it to your computer with USB cable. On Robot Project Center, under Choose NXT/EV3, choose your NXT brick or use Find NXT/EV3 to connect to your NXT brick. Check you are in Direct mode, then click run command on front panel or block diagram tool bar. The Hello World! message should display on your NXT brick screen for 1 second.
Section 1.5: Running NXT motor
In this section, you will learn how to use LabVIEW to program a NXT motor to run for 5 seconds then brake. Create a new VI through Robot Project Center. On the block diagram, right click to open function palettes → I/O → Move Motors.
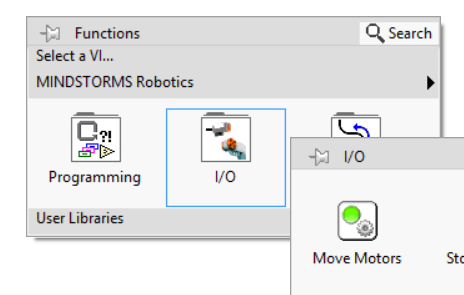
The Move Motors function is also a polymorphic VI. Click on the text box below function and you can choose between Constant Power or Constant Speed. To set the power for motor, right click on bottom left connector of function → Create → Constant. The default speed of motor is set at 75.

Now, you need a function to tell NXT brick how long NXT motor should run for. Open functions palettes → I/O → Wait For. The Wait For function is also a polymorphic VI. Click on the text box below function to check the different instances you can create. You need the function to wait for 5 seconds.

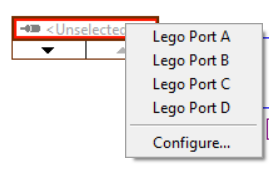
Finally you need the motor to stop. Open functions palettes → I/O → Stop Motors to create a brake function. Without specifying the motor, NXT brick will send these commands to every motor port. To choose a motor port, right click on the top connector of motor function → Create → Constant, then click on constant box.
You will need to specify the sequence in which functions will be executed. To specify order, use NXT/EV3 connector to wire the functions together.

The program will set motor power at 75, wait for 5 seconds, then brake all motors.
Examples
Section 2.1: Synchronizing Two Motors
Slight differences in NXT motors will cause them to rotate at different rates. This issue become apparent when using two NXT motors to drive in straight line. To solve this problem, you can implement a feedback control. NXT motors have built-in encoders. You can write a program that adjusts power levels to reflect the difference between two encoder readings.
Encoder values can be accessed through Motor Status function. Open functions palette → I/O → Advanced Motors → Motor Status. You will also need Reset Encoder function, which right next to Motor Status function
If your motors are connected to ports A and B, then the power input of motors can be adjusted according to this:
Motor A Power = constant - gain * (Motor A Encoder - Motor B Encoder)
Motor B Power = constant + gain * (Motor A Encoder - Motor B Encoder)
The constant represent the target motor power you want to achieve, the difference between encoder values represent the possible errors, and the gain represent how much weight you want to place on the error, which is called proportional gain.
Here is an example of how to implement proportional controller to synchronize two motors.
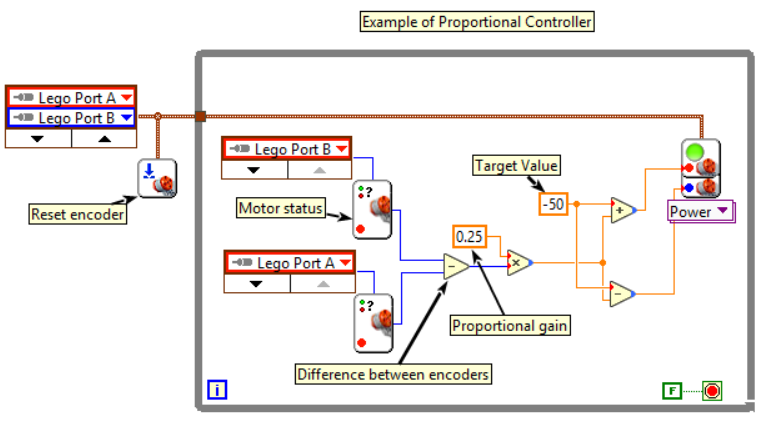
If motor B encoder is greater than motor A encoder that means motor B is running faster than motor A and the difference between 2 encoder values will be positive. After multiplying the proportional gain, this positive value will be added to power of motor A and subtract from power of motor B. Otherwise, power of motor A will be decreased and power of motor B will be increased instead. Through feedback control, the power of motors will constantly adjusting to reflect the difference in encoder readings.
Section 2.2: Proportional Integral (PI) Controller
Encoder function can be used to program NXT motors to rotate to desired position. However, at high power level, motor will overshoot desired position. Proportional integral controller can be implemented to accurately rotate NXT motors to desired position. Here is an exmple of PI controller.
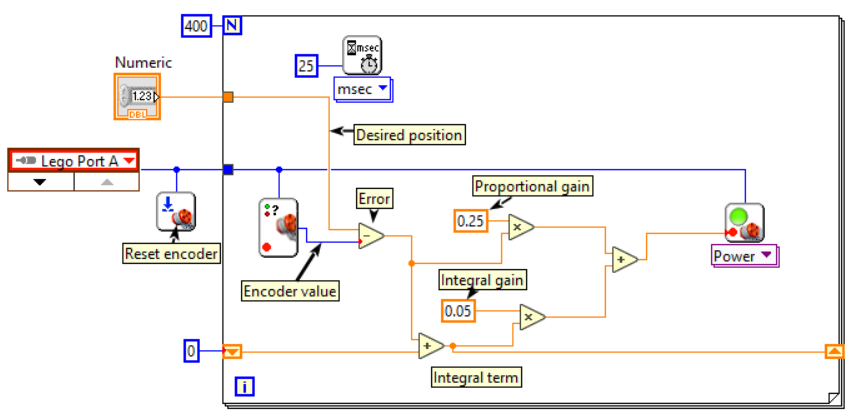
Desired position from user input is the setpoint and encoder values are measured process variable. The difference between setpoint and encoder values represent error. The controller constantly adjust motor power, the control variable, to minimize error based on proportional and integral term.
Final Words
This tutorial's objective was to introduce LabVIEW module for LEGO MINDSTORMS and demonstrate how to program NXT motor. The tutorial covers installation of LabVIEW module, how to write program for NXT brick, and how to control NXT motor. Once the concepts were conveyed the reader could use LabVIEW module for LEGO MINDSTORMS to program NXT brick and motor.
LabVIEW module for LEGO MINDSTORMS included help manual and examples, you can access them through toolbar on top of front panel or block diagram. Go to Help → Find Examples or MINDSTORMS Module Help.
For questions, clarifications, etc, Email: hey6@unlv.nevada.edu
