
This is an old revision of the document!
Computer Vision using Kinect Sensor
Author: Joao Matos Email: jcunha@id.uff.br
Date: Last modified on 6/8/2016
Keywords: Computer vision , OpenCV , Kinect , OpenNI
This tutorial will present all the instructions to install and run the Microsoft Kinect sensor using OpenNI library and how to use it together with OpenCV Libraries , using a CIDE for Windows. ---- ===== Installation Instructions ===== Installation instructions to run your Kinect Sensor (The sensor that i'm using is the Kinect for Windows , model 1517 ). Using OpenNI 2.1 , NiTE 2.0 , Kinect SDK 1.8 and Visual Studio 2015. ** Downloading Required Softwares :** .[[https://www.microsoft.com/en-us/download/details.aspx?id=40278 > GENERAL , add a new path to additional include directories. The path should be OpenNI2>include (again look where you saved the OpenNI2 when you installed it , the default location is under C>program files).
5) Under LINKER> GENERAL, add a new path to additional libraries directories . The path should be OpenNI2>lib.
6) Under LINKER > INPUT , add a library to additional dependencies . Add the OpenNI2.lib
7) Include on your Visual Studio project header : #include <OpenNI.h>
8) If you did all right , the OpenNI library can be used now.
9) Try to run the commands:
<Code>
              openni::OpenNI::initialize();
	openni::Device device;
	auto ret = device.open(openni::ANY_DEVICE);
	if (ret != openni::STATUS_OK) {
		throw std::runtime_error("");
	}
	//Opening Depth stream
	openni::VideoStream depthStream;
	depthStream.create(device, openni::SensorType::SENSOR_DEPTH);
	depthStream.start();
</Code>
If you can compile this commands is because your OpenNI library is successfully installed.
How to get Depth image and convert to World Coordinates
This code presents how to get the Depth stream using the OpenNI Library , and how to work with this depth information to obtain the Cartesian Coordinate of an object.
Introduction : How the Kinect works:
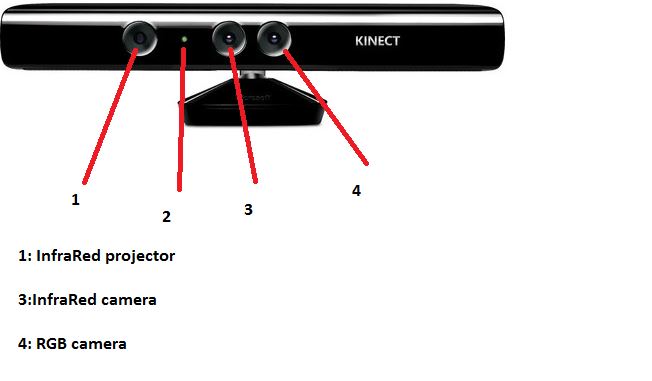
In simple words , the Infrared projector sends infrared lights to the room , if you cold see these lights you would see a lot of dots projected in all your Kinect field of view. The Infrared camera analyze the pattern of the dots project into all the surfaces that intercepts the Infrared ray and by the Kinect software processing the Kinect can tell how the surface is ( if it is a flat surface , if it has curves , etc..) and also it can say how far is the projected dot from the camera (That's how we get the Depth Stream ).
The Depth stream obtained by the OpenNI library from the Kinect has stored the depth value of each pixel. So if you know in what pixel the object that you want to know the distance is (By analyzing the Colored Stream for example , or By running your object detection algorithm first ) , you only have to see the value of this same pixel on the Depth image and you get the distance (after doing some calculations).
The problem is that the RGB camera and IR camera are not on the same place , so the object located in the (x,y) pixel on the Depth Stream is not necessarily the same object located in the same (x,y) pixel of the Colored Stream. Fortunately we can use the OpenNI library to convert pixels from the Depth stream to the Colored Streams ( The values will be pretty close , so if your object is more than approximately 10×10 pixels , you can measure the distance of this object to the kinect using the pixel that is in the center of the object on the colored stream , and see the depth value of this pixel on the Depth Stream ( because the deviation is small and you will continue to be over the object surface on the Colored Stream ). For small object , you might need to use the Coordinate conversor.
For the OpenNI2 for example , you don't need to do any conversion , because you can start the device (kinect) with the command “setDepthColorSyncEnabled(true) ” and you will be fine.
One thing that you have to pay attention is how to get the data from the Depth Stream.
You can get the depth data using this: (it will create the depth array, single row , with all the depth values)
<Code> short* depth = (short*)depthFrame.getData(); </Code>
The depth data is stored into an one row array (so trying to access the depth of the (x,y) pixel will not work) . The pixel that you want to measure (you have the x,y location in the depth/colored streams) is located in the index (pixel x value + (pixel u value)*image width)) : <Code> index = ( PixelCoordinateY*DepthStreamResolutionX ) + PixelCoordinateX </Code>
Finally you get the depth value of your object using:
<Code> short* depth = (short*)depthFrame.getData(); depthObject = depth[index]; </Code>
Using OpenNI to get the depth image:
Initializing : Lets try to open any Kinect connected to the PC , if you did't follow the installation instructions right you will not be able to start the Code and you will get an error message.
<Code> openni::OpenNI::initialize();
	openni::Device device;
	auto ret = device.open(openni::ANY_DEVICE);
	if (ret != openni::STATUS_OK) {
		throw std::runtime_error("");
	}
</Code>
Starting the Streams that you want: (on this case Colored and Depth). We will initialize the “depthStream” and “colorStream” variables to store the streams from the Kinect. Also , lets sync the Depth and Color image so the same pixel will represent the same object on both streams.
<Code> openni::VideoStream depthStream;
	depthStream.create(device, openni::SensorType::SENSOR_DEPTH);
	depthStream.start();
	openni::VideoStream colorStream;
	colorStream.create(device, openni::SensorType::SENSOR_COLOR);
	colorStream.start();
	device.setDepthColorSyncEnabled(true);
	device.setImageRegistrationMode(openni::IMAGE_REGISTRATION_DEPTH_TO_COLOR);
</Code>
Useful Variables: Lets start two variables to store frames from the depth and colored streams. This is very useful because you will want to run your image processing algorithm into this Kinect data , and you will need a “Mat” variable with your frames stored to work with. <Code> cv::Mat depthImage;
cv::Mat colorImage;
</Code>
Getting the frames: Now we introduce the infinite loop to keep getting frames from both streams . We need to create variables to store this frames , you do it with openni::VideoFrameRef , followed by a readFrame. The depth frame will be stored in the “depthFrame” variable and the colored frame into the “initialcolorFrame” variable.
<Code> while (1) {
		// Create frames from depth and colored streams.
		openni::VideoFrameRef depthFrame;
		depthStream.readFrame(&depthFrame);
		openni::VideoFrameRef initialcolorFrame;
		colorStream.readFrame(&initialcolorFrame);
</Code>
Storing the frames in the Mat variable: Now we want to store these frames into “Mat” variables so we can use the OpenCV function on it. The OpenNI Colored stream will give a BGR frame ( the colors will be strange ) , so we just need to convert it to RGB using the OpenCV function “cvtColor”.
<Code>
CREATING THE COLORED IMAGE const openni::RGB888Pixel* imageBuffer = (const openni::RGB888Pixel*)initialcolorFrame.getData(); ColorFrameBGR.create(initialcolorFrame.getHeight(), initialcolorFrame.getWidth(), CV_8UC3); memcpy(ColorFrameBGR.data, imageBuffer, 3 * initialcolorFrame.getHeight()*initialcolorFrame.getWidth() * sizeof(uint8_t)); cv::cvtColor(ColorFrameBGR, ColorFrameRGB, CV_BGR2RGB); CREATING THE DEPTH IMAGE
depthImage = cv::Mat(depthStream.getVideoMode().getResolutionY(), depthStream.getVideoMode().getResolutionX(),
CV_16U, (char*)depthFrame.getData());
</Code>
Now we have two images , “ColorFrameRGB” that is Mat type and has a colored frame , and “depthImage” that is Mat type and has the depth image (NOT THE DEPTH VALUES). REMEMBER that the depth values are stored into the depthStream variable , not in the depth image variable. The depth image variable only show what the “depth camera” see (is a grayscale image where the the color changes depending how far the object is from the camera ).
Finally you can run any OpenCV detector or function ( Like edge detector , shape detector , blob detector or any other advanced detector (like SURF , SIFT , etc…) using the “ColorFrameRGB” image.
Convert Depth coordinate to World coordinate:
There are two ways to get the World Coordinate from the depth image. First we can use an OpenNI function and get it straight , or we can use some algebra , and knowing the Kinect camera parameters we can find where the object is in relation with the camera referential . I'm working with the algebra approach , because sometimes you will get errors from the OpenNI function (depending on the depth image quality ).
The OpenNI function is:
<Code>
		float x = 0;
		float y = 0;
		float z = 0;
openni::CoordinateConverter::convertDepthToWorld(depthStream,
200,200,depthImage.at<openni::DepthPixel>(200, 200),&x,&y,&z);
</Code>
you need to first initialize three variables to store the World coordinates given by the function (x,y,z). The Coordinate Converter will use the depthStream . The third and forth arguments are the pixel location of your object (on this case i want to know the world coordinate of the object located on the pixel (200,200). The fifth argument is the same object pixel but given in Depth Image Pixel (just use depthImage.at<openni::DepthPixel>(x location, y location) ). The last three argument will store the x,y,z world coordinates of the object.
Algebra Approach: You can follow the math presented here.